Today I’m guest posting over at At Home With Kim. I was excited when Kim asked me last month if I wanted to share over in her space. I’ve mentioned Kim to you all before, and what a blessing she is. She’s so motivating and inspiring when it comes to setting and achieving healthy living goals. And don’t forget you all can join our Weigh in Wednesday group over on Facebook that Kim started. We’re a bunch of friendly gals! 😉
Hope you’ll head over to Kim’s site where I share some healthy living and weight loss inspiration…..and links to a few of my favorite recipes to help jump start you like this chinese chicken salad. Think I need to make it this week! it’s so good. I like to make a big bowl and have it for lunch everyday. I hope you’re having a great week!
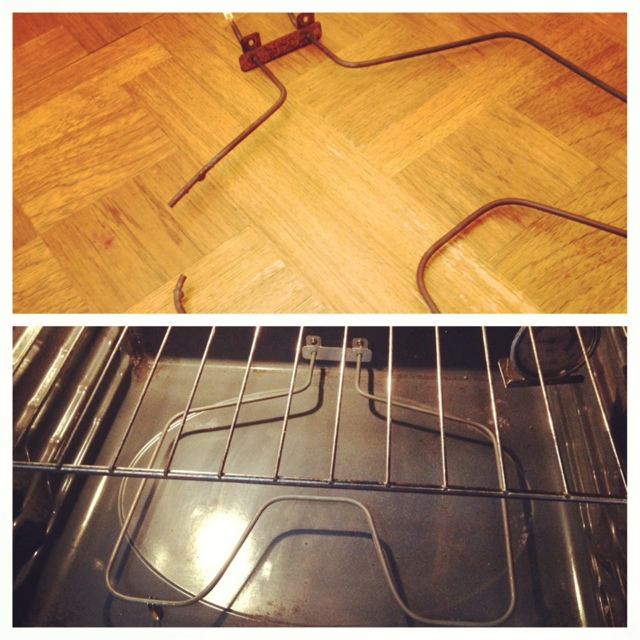
A couple weeks ago we had an interesting thing happen to us. We heard a really strange humming noise coming from the kitchen. I glanced over only to see what appeared to be a fire inside the oven! I opened the oven and saw a section of the oven element glowing red hot and bubbling up. I immediately turned the oven off, and was slightly nervous that something bad had happened to my oven. The next time I went to turn on my oven, I noticed the element was snapped in half in the same spot that had bubbled up the night before. I turned on the oven and of course the element didn’t get hot.
My mind spiraled into several arenas at that moment. One…I was pretty sure we could just replace the element and not have to replace the entire oven. For another…I was positive it would be an easy job. But the biggest thing that stuck in my head is that it probably wouldn’t be addressed for quite a bit of time. Before acquiring my long awaited toaster oven last year, it would have been a NEED to do as soon as possible. Now unless I’m baking or making pizza, I can go days without turning it on. My toaster oven does SO much!!
My hubby and I are fairly handy, but knowing how busy we are, along with having our toaster oven and the fact that it might be hard to track down the element we needed…I was mentally preparing myself for a long wait. I decided to jumpstart his interest by looking up “how to replace an oven element” on You Tube. Sure enough…I was able to see how to do everything in an easy instructional video. A bit of searching on google revealed that we would probably have to order the part or get it at an appliance store instead of just running down to Home Depot and Lowe’s. When hubby walked by, I mentioned the video and he sat down and watched it.
Fast forward to Saturday morning, and before I could even get out of bed hubby was already in the kitchen removing the old element. Yay!! Success!! Make sure you turn off the breaker (he did). It was an easy process of removing a couple screws down at the bottom of the inside of the oven. He took it with him and as we suspected…no luck at the local big box stores. 😉 I googled local appliance part stores and found two in the same area. I was equally surprised when he didn’t mind traveling downtown to find those stores. I gave him the directions via our map app, and thankfully they were open even though it was 8:30am. We happened to get the last element of the kind we needed. Hubby did have to call and get the model number and serial number off our current oven. I wouldn’t have known where to look, but they told him to have me open the bottom oven drawer and sure enough it was right there on the side edge.
I was starting to get hopeful now. He came home ready to install the new oven element. The only glitch we’d had so far was when he removed the element, there were supposed to be wires that you unattached from the back of the element after you unscrewed the attached area. When hubby had unscrewed things, the element just snapped right out, and he never did see any wires. They told him at the appliance parts store that he would be able to find those wires by pulling the oven out and removing the back panel. We immediately found those wires…it was very obvious…so we pushed those back through to the front. Then hubby reattached the wires, put the screws back in and made sure the element rested firmly on the oven floor. We turned the breaker back on, turned on the oven and it worked!!! Awesome!!
It was EASY, and you can do it too! Aside from the money we saved from not having to have a repairman come out, we also saved the waiting on a part to be ordered, come in and the appliance guy come back out. So our oven was up and running immediately instead of a few days or a week later. Key point is making sure you have your breaker turned off. 😉 The video mentioned unplugging the oven which hubby didn’t do and he was fine. I’m SO thankful that hubby was on the ball and got our oven fixed! Because you know, even though I use my toaster over for everything, I was suddenly craving homemade pizza! Did I mention the BONUS? I finally got around to cleaning my oven. I won’t tell you how long overdue that was.
Has something similar happened to you? What repair job around your house ended up being an easy fix?
If you enjoyed this post or recipe, please pass it along! There are many ways you can SHARE. One of the most popular options is to PIN it on Pinterest or to LIKE it on Facebook. It really makes my day! To make sure you don’t miss a post or recipe you can either follow Creative Kitchen on Facebook or Pinterest. Or subscribe by RSS subscription or Email in the sidebar. It’s FREE! Thanks for reading….I love having company in the kitchen!
My favorite time of the month….Secret Recipe Club time! I know I tell you every month, but it really never gets old. I seriously love getting my blog assignment! It’s like Christmas time every month. I LOVE surprises, and I LOVE pouring over my assigned blog getting to know a new to me blogger. And scouring through her recipes is kinda like getting to pour through someone’s cookbooks and cooking notes. I feel like a voyeur. Does that make any sense?
I always find at least 5 to 8 recipes that I can’t wait to try, and I have to say the hardest part of all is trying to narrow it down to one. I promise one day I won’t be able to do it, and you’ll be here staring at two or three recipes because I couldn’t settle on just one. Would that be okay? I’m not quite sure if that would break club rules or not.
This month I had the great pleasure of getting to know Rhonda over at The Kitchen Witch. I have to say she is one of the most interesting food bloggers I’ve had a chance to read. Where to start? Like me, she’s a Veteran. I was Navy, she’s retired Air Force but also grew up a Navy brat. She had the chance to live in Germany, but now lives in Great Falls, Montana. I’ve never been to that area of the country, but I hear it’s beautiful and I can’t wait to one day travel all over our beautiful country. She’s also an avid motorcycle rider!
I really can’t do the introduction justice, so you just have to click over and check out a pic of Rhonda on her bike. She also explains the origins of a “Kitchen Witch” and what it is. It was new to me, and a very interesting European custom. Another neat tidbit is that her daughter is the one who sparked her interest in food blogging. And like me Rhonda is addicted to Google Reader. I love, love, love having all the blogs I read organized into one place! Love it!!
The recipe I chose this month was Sandbakkels. You know I’m always intrigued in recipes from another country. The name alone pulled me in. It turns out that Sandbakkels are a traditional Norwegian Christmas cookie similar to shortbread. The dough is pressed into tin molds and baked so they take on unique shapes. It is quite the Scandinavian tradition which I definitely couldn’t do justice because I didn’t have the tins. I debated trying to find and buy them in time for this post, or just using another recipe since I didn’t have them.
But in the end I couldn’t resist just making them right then and there. I decided to flatten them into discs like a gingersnap, and spreading them with Lingonberry jam that I bought from Ikea! You know keeping with the Scandinavian flair and all. The icing on the cake or should I say cookie, was when I realized the cute little dish I was eating them off of was made in Norway. That was so cool in and of itself that I decided they must be photographed on said dish. I should’ve taken a picture of the dish alone for you to see. I’ll try to remember to share it on Instagram if you’re interested.
You MUST try these cookies. They are super easy, and SO good! Don’t wait until Christmas although you’ll definitely want to bookmark this recipe and add them to your Christmas cookie list. I’m super interested in getting my hands on these tins which we can probably find them online. Oh yeah, and make sure you click over and check out Rhonda’s pictures of the Sandbakkels in the cute tins. I have a new blog to add to my Google Reader, and I’m sure you will too. Happy Reading!!
Sandbakkels ~ A Norwegian Cookie {Secret Recipe Club}
Author: Rhonda @ The Kitchen Witch Blog
Recipe type: Cookies, Dessert, Christmas
Prep time:
Cook time:
Total time:
Serves: 48 cookies
A traditional Norwegian Christmas shortbread type of a cookie that's baked in tins.
Ingredients
2 sticks butter, softened
1 cup sugar
2 Tbsp brown sugar (I used extra ¼ cup)
2 Tbsp powdered sugar
1 egg
½ tsp pure vanilla
½ tsp sea salt
2 cups all-purpose flour (I used extra ¼ cup)
Instructions
Preheat oven to 375 degrees.
In mixer, cream together butter and all sugars.
Add in egg, vanilla and salt. Mix well.
Add in flour and mix until just combined.
Roll into a good sized ball and place on ungreased cookie sheet.
When all cookies are on the sheet, flatten each ball with a sugared bottom of a glass till flat.
Bake 8 to 10 minutes until done keeping a close eye.
Cool on baking sheet on a cooling rack.
Eat them topped with jam of choice (mine was Lingonberry from Ikea). I also topped them with homemade whipped cream and then added the jam on top of that.
*** If you have the Sandbakkel tins, press into tins to bake and bake for 10-13 minutes. Cool in tins for 5 minutes and turn upside down to tap out. Fill with jam or lemon curd, topping of choice. ***
CALORIE COUNT: Each cookie is 65 calories if made in the method I made.
2.2.1
** Recently I’ve learned that a few of my friends have never been to Ikea!! If you’ve never been, it’s a life experience not to be missed. Make sure you click on my IKEA link above to read about one of my visits there. I share in photos! Have you been?? **
If you enjoyed this post or recipe, please pass it along! There are many ways you can SHARE. One of the most popular options is to PIN it on Pinterest or to LIKE it on Facebook. It really makes my day! To make sure you don’t miss a post or recipe you can either follow Creative Kitchen on Facebook or Pinterest. Or subscribe by RSS subscription or Email in the sidebar. It’s FREE! Thanks for reading….I love having company in the kitchen!
Other than Thanksgiving and Christmas, I really don’t worry too much about sharing recipes here in time for holidays or big foodie events. Sure I really would love to be so organized that I had some incredible appetizer recipes lined up for the Super Bowl last week….but hey, we were in Disney getting our last use out of our season passes before they expired Feb. 7th. 🙁 And for Floridians or any Disney fans, that’s important! As all the other food bloggers hammered out delectable game food, I really did feel like I was missing out. I’d like to have something for you guys out in time every now and again.
Here Valentine’s Day is fast approaching. I’m kind of indifferent to Valentine’s Day. I love the idea of love, romance, yada, yada, yada. But I also hate the pressure society puts on guys that they have to BE romantic on that one particular day per year. AND let’s not forget about the expectations that puts in the poor woman’s head. The commercials on tv are quite bad about that alone. Thank goodness I don’t watch that much tv. 😉
So I have a treat for you!! Just in time for Valentine’s Day. And it’s good….these cookies are AMAZINGLY good! I mean you can’t go wrong with a Snickerdoodle cookie. I made these for Christmas. Snickerdoodles are a tradition my grandmother started, that my mom continued and I still continue. They’re a tradition in our home, and every year I’m surprised that I don’t have the snickerdoodle here on the blog yet. This past year I did something different with the snickerdoodle. I added vanilla to it to make it more like a sugar cookie, frosted it with homemade white chocolate buttercream icing and sprinkled crushed peppermint over the top! Sound amazing don’t they? They were!!
My first introduction to these type of cookie was from my good friend Jennifer years ago at her Happy Birthday Jesus birthday party that she invites us to every year. It’s a great time to catch up with our friends, eat good food and walk around her neighborhood looking at Christmas lights. Her neighborhood has a great tradition of putting out food at the ends of the driveways each year, and we all walk around, sample treats and take in the festive lights. Santa rides around tossing candy canes from the back of a truck. I guess this is another way Florida tries to be festive with Christmas traditions since we can’t conjure up snow.
Yeah…I know these are technically a Christmas cookie, and I made them for Christmas this year and I’m sharing a Christmas tradition with you. But when I saw how much they reminded me of Valentine’s Day (hey, they are red and white aren’t they?), and that I hadn’t shared them with you guys….I convinced myself that they’d make the perfect Valentine’s Day treat! What do you think? Am I in time for Valentine’s Day or late for Christmas? LOL…or maybe I’m just very early for next Christmas? You be the judge!
TELL ME: What’s your take on Valentine’s Day? Hubby and I usually do something fun, but I much prefer celebrating our anniversary.
In mixer, cream butter and sugar together. Mix eggs in.
Add vanilla, soda, salt and cream of tarter. Mix well.
Blend in flour.
Roll into small balls the size of a walnut.
Bake for 8 to 10 minutes on ungreased cookie sheet.
Cool on cooling rack for a few minutes, then transfer off cookie sheet.
Chill dough in between batches.
Makes 6 dozen.
TO MAKE ICING:
Melt chocolate over low heat or in double boiler on stove.
Stir in cream.
In mixing bowl, mix together butter and powdered sugar.
Mix in chocolate and cream until creamy.
TO FROST COOKIES:
When cookies are cooled, spread each one with icing and sprinkle with crushed peppermint.
2.2.1
If you enjoyed this post or recipe, please pass it along! There are many ways you can SHARE. One of the most popular options is to PIN it on Pinterest or to LIKE it on Facebook. It really makes my day! To make sure you don’t miss a post or recipe you can either follow Creative Kitchen on Facebook or Pinterest. Or subscribe by RSS subscription or Email in the sidebar. It’s FREE! Thanks for reading….I love having company in the kitchen!
I have a new love in my life. I’m not being dramatic, and I know I’m late jumping onto this particular bandwagon! I’m not a tv watcher so that’s what makes it even sweeter. If you haven’t jumped onboard this PBS masterpiece theater train…..do so immediately! As in ASAP. Run….don’t walk to your nearest streaming device.
What can I say about Downton Abbey? I love period pieces, but it’s been a long time since I’ve been taken captive by one of them. Can I gush for a minute…..I love the cinematography, the scenery, the styles and fashion, the visit to another time period (early 1900’s), the british culture, the history, the accents and quite surprisingly the storyline. It’s clean, modest, appropriate and in the world we live in, it’s nice to visit a place and time where manners and modesty still meant something.
I’m sure that’s part of the allure! Downton Abbey is a breath of fresh air on the screen. And if you know of any other series similar that I’d enjoy, please tell me. Hubby is hooked too. Last night my teen daughter lingered around and started asking questions. Sure won’t hurt for her to learn a little bit of history in disguise. 😉
So please don’t give any spoilers. I’ve only just finished season 2. Currently Downton Abbey just started it’s third season last month. I streamed season 1 on Netflix and season 2 on Hulu Plus. All of season 3 is On Demand on my dvr.
TELL ME: Are you a Downton Abbey fan? How long have you been watching? What do you love about it?
If you enjoyed this post or recipe, please pass it along! There are many ways you can SHARE. One of the most popular options is to PIN it on Pinterest or to LIKE it on Facebook. It really makes my day! To make sure you don’t miss a post or recipe you can either follow Creative Kitchen on Facebook or Pinterest. Or subscribe by RSS subscription or Email in the sidebar. It’s FREE! Thanks for reading….I love having company in the kitchen!
I'm so happy you've dropped by. Creative Kitchen is a food blog, a place to inspire myself & hopefully others. Creating in the kitchen is a passion of mine! I love cooking meals from scratch for my hubby & 3 girls using wholesome, REAL foods. I hope you'll find that cooking from scratch can be easy & fun!