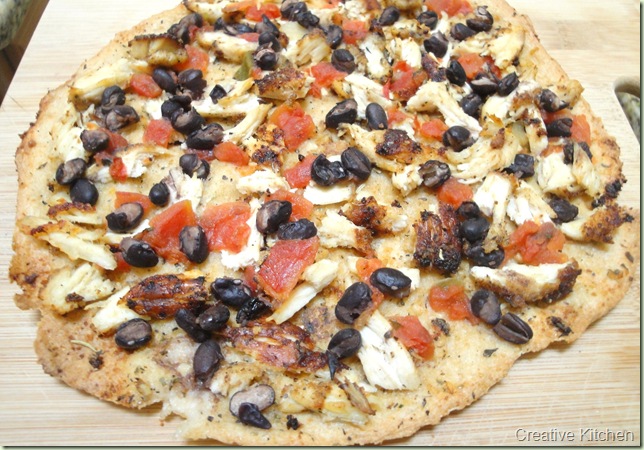
Lighten things up with my fresh mex flatbread pizza

Flat Bread Pizza

After possibly a FULL weekend of eating, or at the very least indulging in a Super Bowl Sunday splurge, I bet many of you are in the mood for something FRESH, LIGHT, TASTY yet, NUTRITIOUS and HEALTHY! Right?? Well you’re just in time for a super EASY meal that’s QUICK to pull together. I made my own whole wheat crust for this flatbread pizza, but if you are short on time (though homemade dough really can be QUICK, especially if you have a Kitchen Aid mixer), you can still whip this up with a store bought crust. We all know homemade is healthier, but sometimes you gotta do what you gotta do. I’m not judging anyone…..


My Fresh Mex Flatbread Pizza

Cooked chicken breast, shredded or diced (I made mine in garlic and olive oil with sea salt/pepper)
Black beans
Homemade salsa or salsa of choice
Italian bread crumbs
Tomatoes, seeded and chopped
Romaine lettuce, chopped
Sour cream (full-fat)*
Olive oil (regular or extra virgin)
Scallions, chopped
Pizza crust of choice or use my homemade whole wheat crust recipe

*I believe in using full fat options. Frequently when a company makes an item low-fat or fat-free they need to compensate either flavor or texture by adding other ingredients (usually ingredients we can’t pronounce). Not to mention full-fat tastes better, we should allow ourselves to eat everything in moderation. It’s all about portion control (and it’s much more satisfying). The fewer ingredients listed on a package, the better it is for you!

Heat oven to 500 degrees. Tear a square piece of foil for each personal pizza you are making. Grease foil with a good sized amount of olive oil. Press and flatten dough on foil to desired thickness. I like mine thin and crispy!! Add a bit more olive oil on top and press into dough. Sprinkle crust liberally with seasoned bread crumbs (you can make your own or buy a fairly healthy version at Whole Foods), probably about 1/4 cup or a bit less. Pop into oven for about 1-2 minutes to cook slightly. I start on my next one while the first one is cooking.

As you take each pizza from the oven, spread it with chicken and black beans. Add Rotel or salsa. I didn’t give amounts because I rarely cook that way, and I rarely make the same thing exactly the same way twice. These are like toppings on pizza…you put the amount of your preference. But don’t put too many or they will weigh your crust down, and possibly make it fall apart. Ever notice it just doesn’t turn out great when you overload a pizza…whether with sauce or cheese? If you want to involve your kids…this is a good point for them to jump in and add their own toppings. Of course it depends on the day you’ve had, whether you want to cook alone or bring in the masses. At least it works that way for me anyway!

Place the pizza back into oven and bake for about 5 more minutes. Keep a close eye on it, and pull it out when you’ve reached desired doneness. If you have a thicker crust, maybe bake it for 6 or 7 minutes. Just keep an eye on it…it really depends on your crust. Meanwhile, chop lettuce, tomatoes and scallions. When you pull the pizza out…let it cool for a few minutes. I immediately remove the pizza from the foil so it won’t stick. Sometimes it does, but it’s easier to remove from the foil when the pizza is still hot. Top the flat bread pizza with sour cream (spread evenly), chopped romaine lettuce, chopped tomatoes and scallions. Slice into quarters and eat!

This was a favorite around here…the crisp lettuce and tomato really bring a lot of flavor to this meal. On hubby’s I rub extra minced garlic into his crust. You can switch up the toppings any way you want. There is SO much you can do with this! Also since I was a vegetarian for over 8 years, I try to be mindful of anyone that needs a vegetarian option. Simply make this without the chicken.

What healthy, light options are you cooking up at your house this week?

Flat Bread Pizza2


**Don’t forget to use the “share” buttons below if you like this recipe. It’s a fresh summer meal option to share on Facebook. Thanks!!
 

*This recipe has been linked up with Mouthwatering Monday, Homemaker Monday, Made by You Monday, Monday Mania, Melt in Your Mouth Mondays, Mangia Mondays, Delectable Tuesday, Tuesdays at the Table, Hearth and Soul Hop, Tasty Tuesday, Twister Tuesday over at GNOWFGLINS, REAL FOOD Wednesdays over at Kelly the Kitchen Kop What’s on the Menu Wednesday, What’s Cooking Wednesday, What’s on Your Plate, What I ate Wednesday,  Works for Me Wednesday, Simple Lives Thursday, Thrilling Thursday, It’s a Keeper Thursday, Pennywise Platter Thursday, Recipe Swap Thursday, Fight Back Friday, Finer Things Friday, Fresh, Clean & Pure Friday, Family Friendly Fridays, Foodie Friday & Friday Favorites.

23 Comments

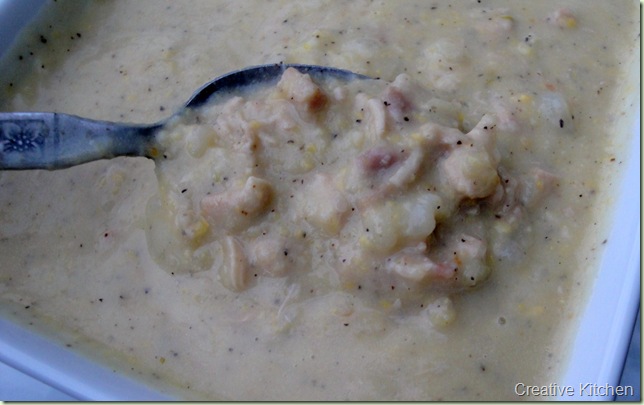
Warm up with corn bacon chowder

Today I’m sharing a delicious, hearty chowder that will satisfy your appetite, as well as warm you up to your very core! I know many of you across the country are bracing for yet another winter storm. I created this recipe this past November when I found myself getting a little weary of our old standbys. I wanted something new!! I’m not normally a fan of “corn” in my soups, but this corn passed muster once I pureed it in my food processor with a bit of whole milk, butter and salt…and there you go, homemade creamed corn. And if you’ve been around Creative Kitchen very long, you know I used organic corn. It’s the best!

Corn Bacon Chowder

 
Corn Bacon Chowder

2 quarts filtered water
2 Tbsp chicken broth, base, stock or bullion
5 large organic potatoes, peeled and diced small
2 organic chicken breasts, diced and cooked
3 slices bacon, hormone free, nitrite & nitrate free, chopped
2 carrots, minced
1 stalk celery with leaves, minced
1/2 tsp onion powder or 1/4 cup minced onion
1 – 2 Tbsp extra virgin olive oil (for cooking chicken)
1 tsp minced garlic (2 cloves)
2 cups organic corn
1/2 – 3/4 cup organic whole milk
1 – 2 Tbsp butter, softened
sea salt, sprinkle to taste
pepper, sprinkle to taste
a bit of garlic salt

In a soup pot, add water, chicken broth or bullion, and the diced potatoes. Sprinkle with pepper and add onion powder. Bring to a boil, lower heat a bit, cover and boil until fork tender. Mince the carrots and celery in a food processor, and add to the pot.

Meanwhile in a medium skillet, cook diced chicken in a bit of olive oil. While the chicken is cooking sprinkle in sea salt, pepper and a bit of garlic salt. Add in the chopped bacon. When everything is almost cooked, add in the minced garlic.

To make creamed corn: Add corn, milk and butter to the food processor. Puree. Add creamed corn and the chicken/bacon combo to the soup pot. While stirring, mash up the potatoes and add more milk if needed.

This made enough dinner for our family of 5, with a little leftover. The chowder was a big hit with everyone! What’s cooking at your house? What is your family’s favorite soup or chowder?

*This recipe linked up with Real Food Wednesday hosted by Kelly the Kitchen Cop. Be sure to stop by and check out all the amazing real food recipes!!

20 Comments

Spaghetti Garlic Crostini

These are just too good to keep for myself!! Spaghetti is one of my oldest daughter’s very favorite meals. My husband, on the other hand, can take it or leave it. Don’t get me wrong…..when I make it, he always goes back for seconds, and declares it an incredible meal. But he’s just the type of guy that has stand out cravings like ribs, wings, steak, fried chicken…well, you get the picture…a meat and potatoes type of guy.  So last week when we had leftover pasta, I remembered this creation from the fall of 2009. He’s a sucker for garlic bread so I knew this was a win-win.

When hubby saw me pull these out of the broiler…he could barely contain his appetite. He and I were saving our dinner for later, when the kids went to bed so we could have an at-home date…something we frequently do. It involves a movie, and sometimes a glass of wine. Usually we have steak kebabs or something along those lines…you know man-pleasing (you’ve worked hard all week, honey), but I have to say that these met and exceeded hubby’s expectations, and will definitely make an appearance at date night again. And what an easy meal to pull together, and a great way to repurpose leftovers! Especially since the taste of pasta sauce always improves over time.

Spaghetti Garlic Crostini

Spaghetti Garlic Crostini

Leftover spaghetti (originally make enough for 2 nights)
Fresh mozzarella, about 10-12 ounces
Fresh basil, chopped, optional
Large fresh baguette, Italian or French
1 1/4 sticks butter, melted
Garlic salt
Garlic powder

Melt butter in small saucepan while slicing baguette in thin diagonal slices (about 1/4 inch thick). After slicing bread, set the oven to preheat with the broiler on high. Using a pastry brush, spread butter on each slice as you lay them on a cookie sheet. I used 2 cookies sheets. Afterward, sprinkle all slices with a bit of garlic salt and garlic powder. Put into oven to toast to a golden brown. I toasted 1 cookie sheet at a time, so that while one was toasting…I was buttering the next pan. Keep a close eye on the crostini so that you don’t burn them. Put the second pan in when you take the first one out.

Next spoon spaghetti on each crostini slice. When I make spaghetti, I usually mix my sauce with the pasta before serving so we can melt fresh mozzarella throughout (think baked spaghetti). If yours are separate, just make sure to mix them before spooning onto bread slices. After each slice has pasta, dot it with a bit of fresh mozzarella and sprinkle with fresh basil. Place back under broiler long enough to melt cheese and warm the pasta (about 3-5 minutes). Rotate pans again. To serve vegetarians, just leave out the meat when making your sauce.

These were such a huge hit that my family has now requested that this meal always follows our spaghetti nights. In fact, even today (3 days later), I was asked if there were anymore left. What dishes have you invented using leftovers at your house? Were they a hit?

This recipe shared at Real Food Wednesday.

18 Comments

It’s strawberry season in Florida…time for crepes!

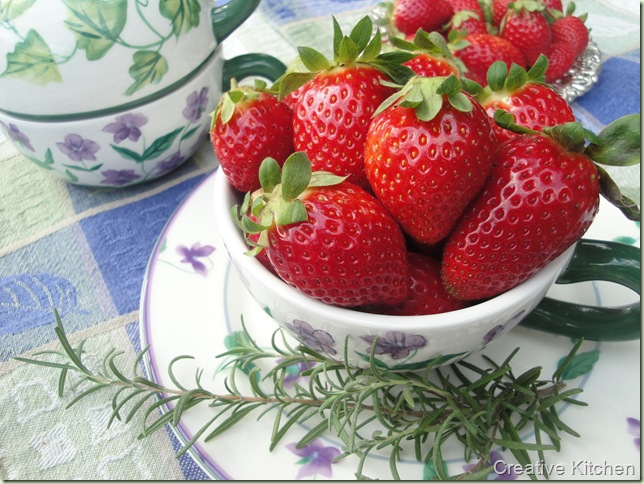
Strawberries

Bare with me as I take another jaunt down memory lane…food and music seem to be intertwined with most of my childhood memories. My first experience with crepes happened during childhood…seaside, when I was living in Maryland. I’m not quite sure of my age, just that I lived in Maryland for 2nd, 3rd and 4th grades…so I was probably about 8 or 9. We were in a restaurant, and I’m not even sure how they ended up on my plate…they could have been on my mom’s plate for all I know. Or possibly she recommended them to me since she loves them also. But it was love at first bite with these strawberry crepes. I’m sure sweetness played a big role, as I’m always a sucker for sweets.

But you know what else, they also sounded fancy to me…grown-up…and though they only made sporadic appearances over the course of my first 20 years due to circumstances beyond my control, I did seek them out whenever possible. And if they were on any breakfast menu, you could be sure that’s what I was ordering. It never even occurred to me that crepes were something that I could learn to make for myself…they seemed so exotic and foreign to me…French. 

In my 20s during college, I purchased a crepe maker. A special electric gadget that looked like a paddle with a non-stick round surface at the end. You would pick up the “paddle” and dip it into your batter and flip it over. When the little glowing light turned off, your crepe was ready to be plucked off the paddle. It was a handy little gadget, and I thought it was needed to make crepes. OH…talk about heaven!! I could finally savor crepes without having to go out to eat. This would definitely save me some money! Too bad I didn’t have one of these when I lived in Hawaii…it’s sad to think of all the missed crepe opportunities over the years.

In my 30s I discovered that crepes could be made in any non-stick pan, which was really a huge eye-opener for me. Maybe mine aren’t always as thin as you consider crepes, but over the years I’ve gotten quite good at getting them pretty close to what passes as a crepe. And hey…the taste is “spot on”, so I’m happy!

I received these organic beauties in my share from Affordable Organics last week, and put them aside to make what else…strawberry crepes for my girls! Ripe, luscious strawberries, and for most of you in the dead of winter…I know it’s a tease. But that’s one of the advantages of living in Florida….it’s strawberry season right now!! Oh please don’t hate me.

Crepes

2 cups whole milk
2 eggs
2 cups whole wheat flour (or your flour of choice)
pinch of sea salt
2 heaping Tbsp sugar (omit for savory crepes)
1 tsp pure vanilla (optional, or extract/flavoring of choice)

Add ingredients to blender in order listed. First blend milk and eggs thoroughly. Then add flour 1 cup at a time, blending after each addition. Follow with remaining ingredients. Blend till smooth.

Technique

Have a lot of butter on hand. I use a medium sized non-stick skillet. Set the burner between 6 and 7, though I turn it down to 5 after the first few crepes have been made as it tends to get hotter as time goes by. For some reason, the 1st one is usually a dud (meaning I have to pick it up in a couple pieces off the pan). Let’s call it a practice run. After that I have no issues. I ladle the batter right out of the blender and onto the pan. About half a ladle works well for me, but as I am streaming the batter onto the hot pan, I swirl the pan in such a way to coat the entire pan with the batter. After several minutes there will be bubbling, and you will sense it is time to turn the crepe over. I’ve tried spatulas and forks for turning, but have had the best luck with my hand! Easy, quick and it doesn’t even burn. Continue until all batter has been used, greasing the pan for each crepe.

Serving ideas

This is where it gets good!! More often than not we fill them with fresh strawberries, and roll them up. Sometimes we use frozen peach slices that I’ve thawed. You can make an apple filling…seriously, whatever fruit you have on hand or desire. Drizzle generously with pure maple syrup. Perhaps squeeze some fresh lemon juice.

Strawberry crepes

One of my absolute favorites…put the crepe back in the pan, and get it crispy on both sides…crispy, but not burnt. Pull off, coat with butter, squeeze fresh lemon juice over, add a few drops of maple syrup…spread it all evenly, and prepare to bite into a delectable creation!! How do I know? I just ate about four of these tonight. Sheesh…I really have no self-control when it comes to crepes…which is why I don’t make them as often as my girls would like. They’d eat them everyday if they could.

Of course there is also the “savory” option…which I could never quite wrap my mind around. Yeah…no, I haven’t tried it yet. To me crepes scream breakfast….or dessert. So to me, it just seems wrong. There are so many ways to eat crepes. Some sprinkle powdered sugar over the top of them. Others fill them with Nutella or lemon curd (YUM!!), or how about cream cheese and fruit? Really the sky is the limit. You are the flavor creator!!

I’m sure many of you love crepes as much as I do. I’m not sure it’s widely known how EASY they are to make, and that you can in fact, make them for yourself at home. Not only that…crepes are VERY frugal, with few ingredients, and most of them you’d always have on hand. I actually find these easier to make than pancakes, even though I have to make them one at at time. The girls LOVE them, and they definitely pop up as breakfast for dinner at least every month or so. They are a perfect choice for brunch, and very impressive to make for guests.

Now it’s your turn. Do you make crepes in your house? What are some favorite fillings you like to use? Are any of you into savory options for your crepes? I’m interested to know which fillings you use.

P.S. It doesn’t seem right not to mention that 3 years ago today, January 17th, my sweet little Leah (my youngest) was born…Happy Birthday Leah…Mommy loves you!!

“Facebook recommends” and “shares” are always appreciated! Thanks!!

16 Comments

Simply satisfying sweet potato pancakes

DSC02779


Happy New Year!!
I could wax poetically about why this poor blog has been neglected for 6 months, but instead why don’t we find a use for some of those leftover sweet potatoes hanging around in your pantry!

Sweet potatoes…..I clearly remember as a kid, sitting on a bar stool in our kitchen when we lived in Salisbury, Maryland, staring at bits of sweet potato (or quite possibly yams) floating in my glass of water. We were made to finish our meals, and I did not like sweet potatoes. To get them down…like most kids, I would swallow my bites with a gulp of water to ease them down…..tasteless. 

Fast forward to my early thirties…I fell in love with the brown sugar and marshmallow-laden sweet potato casserole, and promptly went about creating my own. This tradition stuck with me for many Thanksgivings, and got increasingly sweeter each passing year.

Who would have ever predicted that my taste buds would mature in a way that would welcome sweet potatoes close to their natural state. No longer do I need to coat them in sugar….they absolutely burst with sweetness when you roast them!! Dice a few, toss them in olive oil and roast them, you’ll see. ADDICTING!!! I can eat an entire pan myself….straight from the pan, or make up this palate pleasing Black Bean & Sweet Potato Tostada. Options are limitless.

Today though…we’re bringing those sweet potatoes to the breakfast table. These pancakes will hit the spot on a cold day in January, not to mention a good way to get sweet potatoes into your children *wink.*

 Sweet Potato Pancakes

1 cup oat flour (I just grind oatmeal in my coffee grinder)*
1 cup whole wheat flour
4 tsp baking powder
1/2 tsp salt
1/2 tsp nutmeg
2 heaping Tbsp honey granules or sugar
1 tsp cinnamon
2 eggs
1 cup milk
1 cup plain, whole milk yogurt **
1 cooked medium to large sweet potato, peeled and smashed with fork***
1/2 stick (4Tbsp) melted butter (real butter!)

Mix all dry ingredients. Then add in eggs, milk, yogurt, sweet potato and melted butter. Mix thoroughly, butter up that skillet and go! This recipe makes enough for the girls and I. Hubby is not much of a breakfast eater, but doubling the recipe will ensure that everyone gets their fill, as well as leftovers for other mornings.

Don’t forget to spread them with real butter, and drizzle pure maple syrup over them. Don’t be shy with the amount….pancakes are made for indulging! And if you’re still using anything other than pure maple syrup…it’s time to make the switch. You are missing out, my friend!

Tips

*You can use all whole wheat flour instead of the oat flour. As always, I use freshly ground whole wheat which really does take whole wheat to a ‘whole new level.’ Not to mention it’s packed with nutrients and vitamins.

**You can use all milk, or half milk, half water or even buttermilk. If using 2 cups liquid without any yogurt, maybe cut back to 1 1/2 cups milk (liquid) or milk/water combo. You really can’t mess it up, if your batter is too runny add a bit more flour.

***You could also use pumpkin instead of sweet potatoes, or even butternut squash…you’re only limited by your imagination. Be sure to try our favorite, fluffy pancake recipe and these low carb cream cheese pancakes.

ENJOY…and let me know your thoughts. It’s GREAT to be back!! Hoping we’ll see more of each other in 2011. I’m excited to get my groove back in the food blogging world. Hope to see some familiar faces!!

This recipe is linked up with Seasonal Sunday.

If you enjoyed this post, won’t you consider sharing it with others? Handy share and “Facebook recommend” buttons are below. It really makes my day when you pass things along! To make sure you don’t miss a post or recipe you can either follow Creative Kitchen on Facebook or subscribe by Email in the sidebar. Thanks for reading….I love having company in the kitchen!

Related Posts Plugin for WordPress, Blogger...
24 Comments