

A couple weeks ago we had an interesting thing happen to us. We heard a really strange humming noise coming from the kitchen. I glanced over only to see what appeared to be a fire inside the oven! I opened the oven and saw a section of the oven element glowing red hot and bubbling up. I immediately turned the oven off, and was slightly nervous that something bad had happened to my oven. The next time I went to turn on my oven, I noticed the element was snapped in half in the same spot that had bubbled up the night before. I turned on the oven and of course the element didn’t get hot.
My mind spiraled into several arenas at that moment. One…I was pretty sure we could just replace the element and not have to replace the entire oven. For another…I was positive it would be an easy job. But the biggest thing that stuck in my head is that it probably wouldn’t be addressed for quite a bit of time. Before acquiring my long awaited toaster oven last year, it would have been a NEED to do as soon as possible. Now unless I’m baking or making pizza, I can go days without turning it on. My toaster oven does SO much!!
My hubby and I are fairly handy, but knowing how busy we are, along with having our toaster oven and the fact that it might be hard to track down the element we needed…I was mentally preparing myself for a long wait. I decided to jumpstart his interest by looking up “how to replace an oven element” on You Tube. Sure enough…I was able to see how to do everything in an easy instructional video. A bit of searching on google revealed that we would probably have to order the part or get it at an appliance store instead of just running down to Home Depot and Lowe’s. When hubby walked by, I mentioned the video and he sat down and watched it.
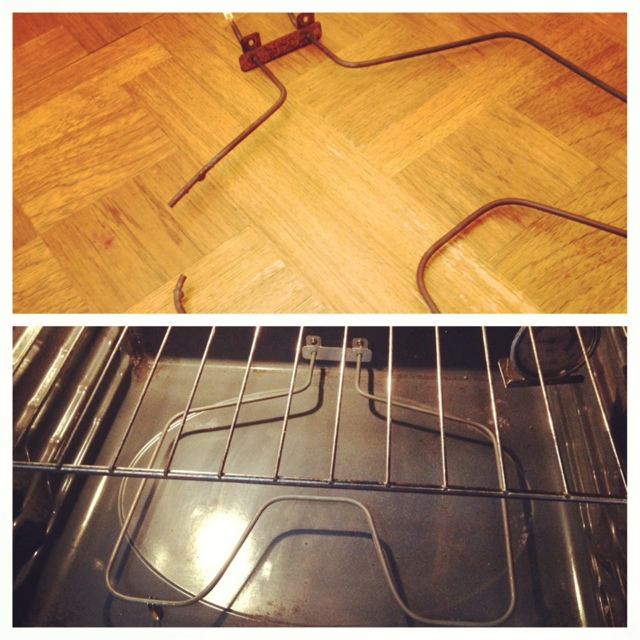
Fast forward to Saturday morning, and before I could even get out of bed hubby was already in the kitchen removing the old element. Yay!! Success!! Make sure you turn off the breaker (he did). It was an easy process of removing a couple screws down at the bottom of the inside of the oven. He took it with him and as we suspected…no luck at the local big box stores. 😉 I googled local appliance part stores and found two in the same area. I was equally surprised when he didn’t mind traveling downtown to find those stores. I gave him the directions via our map app, and thankfully they were open even though it was 8:30am. We happened to get the last element of the kind we needed. Hubby did have to call and get the model number and serial number off our current oven. I wouldn’t have known where to look, but they told him to have me open the bottom oven drawer and sure enough it was right there on the side edge.
I was starting to get hopeful now. He came home ready to install the new oven element. The only glitch we’d had so far was when he removed the element, there were supposed to be wires that you unattached from the back of the element after you unscrewed the attached area. When hubby had unscrewed things, the element just snapped right out, and he never did see any wires. They told him at the appliance parts store that he would be able to find those wires by pulling the oven out and removing the back panel. We immediately found those wires…it was very obvious…so we pushed those back through to the front. Then hubby reattached the wires, put the screws back in and made sure the element rested firmly on the oven floor. We turned the breaker back on, turned on the oven and it worked!!! Awesome!!
It was EASY, and you can do it too! Aside from the money we saved from not having to have a repairman come out, we also saved the waiting on a part to be ordered, come in and the appliance guy come back out. So our oven was up and running immediately instead of a few days or a week later. Key point is making sure you have your breaker turned off. 😉 The video mentioned unplugging the oven which hubby didn’t do and he was fine. I’m SO thankful that hubby was on the ball and got our oven fixed! Because you know, even though I use my toaster over for everything, I was suddenly craving homemade pizza! Did I mention the BONUS? I finally got around to cleaning my oven. I won’t tell you how long overdue that was.
Has something similar happened to you? What repair job around your house ended up being an easy fix?
If you enjoyed this post or recipe, please pass it along! There are many ways you can SHARE. One of the most popular options is to PIN it on Pinterest or to LIKE it on Facebook. It really makes my day! To make sure you don’t miss a post or recipe you can either follow Creative Kitchen on Facebook or Pinterest. Or subscribe by RSS subscription or Email in the sidebar. It’s FREE! Thanks for reading….I love having company in the kitchen!


I had a similar thing happen when our element went out. It is an easy diy fix, in our case it also ruined the computer board as well, that we called in the pros for since we didn’t know much about the electronics of an oven.
Amber
I used to always think this was the kind of thing you absolutely needed to get a pro in to do and i would never even dare touch stuff like this myself until I changed a bulb in my car headlights myself which I always thought was complex. When I realised how wrong I was and how easy it was all along I started trying my hand at other stuff, its a huge money saver