Cowboy eggs & a stroll down memory lane

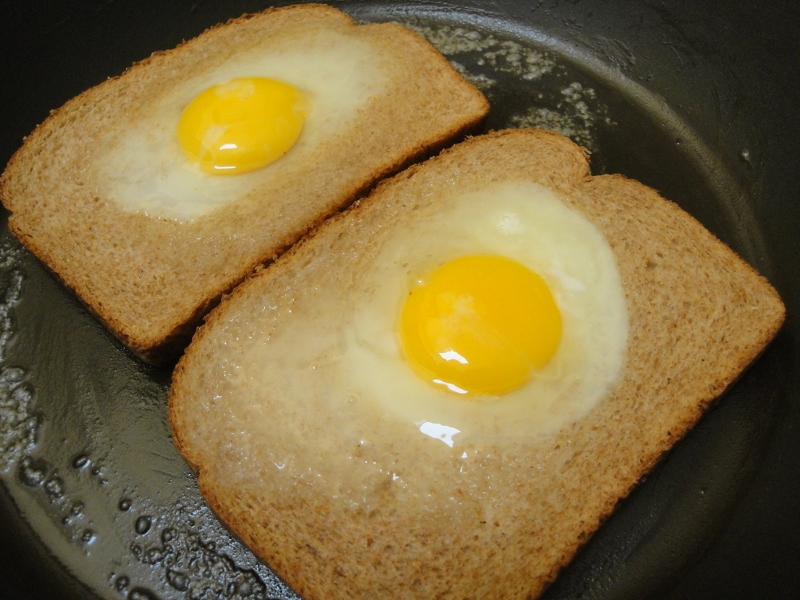
Isn’t there something so pretty about a shiny yellow egg yolk? I don’t know about you, but pictures like this just make me happy! If you’re looking for something new for your kids in the morning, the cowboy egg may be your ticket. I know others call them something else, but in my world they’re known as cowboy eggs. I learned of them back in the day from a family I spent many years with….my first “au pair” gig.

That’s when I also learned about the term “au pair.” The mama (my boss & friend) told me I was an “au pair” which in french means “on par” or “equal to.” Now technically I wasn’t a foreigner and I didn’t live with them, but I definitely was made to feel like one of the family! I was there up to 10-11 hours a day my first summer working for her, and learned how the well-oiled wheels of her family ran. I cared for 3 boys ages 6 months, 4 and 5 without the use of a tv to entertain them. We played blocks, read lots of books and I took them to the library for more books. We played games….connect four was a favorite.

I vacuumed their 2-story house with wood floors, did laundry and learned the proper way to iron pants. I assisted with cooking meals, and then made meals on my own. They were a jewish family so meat was kosher, and one routine meal was a roasted chicken, baked potato with real butter and a veggie. I fell in love with their beautiful big kitchen with wooden floors, and huge almost floor to ceiling windows overlooking a big backyard with trees as far as the eye could see. Maybe that’s another reason for my love of trees. I have such a fascination with them. I cooked dinner with a small radio on npr listening to a mixture of world news, short stories and classical music. When it was time to eat dinner it was expected that I would sit and eat with them and talk about our day…..all the while staring out those huge windows at all those trees.

I worked for them at total of 4 – 5 years (maybe more) during my early teen and teenage years growing alongside their boys. I learned a lot from them, felt like one of the family and am grateful to them for the experience and opportunity they gave me. I learned so much, and really loved those boys! I have a feeling that my time spent there was where my love of domesticity was born. I worked for another family during my college years (after the Navy) and they had twin boys (toddlers), and I find it funny that all my pre-mommy experience was with boys and now I have ALL girls….3 girls.

And my girls love these cowboy eggs. They are absolutely a simple meal to make, but one that never fails to bring a smile. What’s not to love about buttery, crusty bread dipped into shiny warm egg yolk? And everytime I make them I’m transported back in time…to a kitchen with high ceilings, wooden floors, a gas stove, npr and cooking in a seasoned cast iron skillet. I probably can’t count the number of cowboy eggs I’ve made over the years, and though it’s a simple recipe….it definitely deserves a special spot here at Creative Kitchen. They make my heart smile!


4.5 from 2 reviews
Cowboy eggs
Author: 
Recipe type: Breakfast, Snack
Prep time: 
Cook time: 
Total time: 
Serves: 1
 
These cowboy eggs are easy & sure to bring a smile!
Ingredients
  • 1 egg
  • 1 slice bread
  • 1-2 Tbsp butter
  • Pinch of sea salt
Instructions
  1. Butter skillet on medium to medium high heat.
  2. When butter is melted, turn heat down to medium heat. Take a small circle of bread out of the center of the slice of bread (to make a small 2 inch diameter hole in the bread).
  3. Place bread in skillet and crack egg into hole.
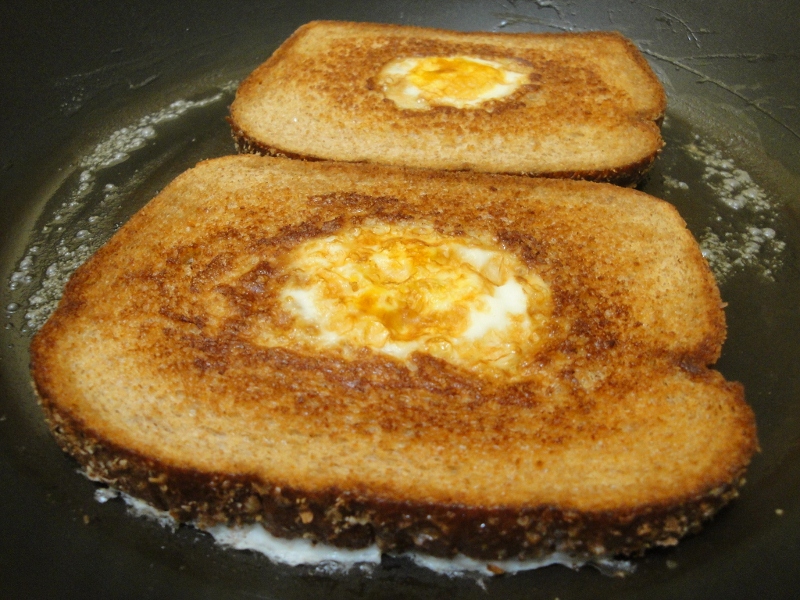
  4. Slide bread around getting it all buttery. After a few minutes (when bread on underside is toasty), flip bread/egg carefully over so as to not break the egg.
  5. Cook an additional 2 minutes until egg white is set, but yolk is still runny. Add more butter as needed. I love a lot of butter!!
  6. Serve with a fork so kids and cut or tear pieces of toast for dipping in the egg. Sprinkle egg yolk with sea salt.
  7. I am able to make 2 at a time in a large skillet.

Pin It

This recipe is linked up with Real Food Wednesday, Cooking Thursday, It’s a Keeper Thursday, Simple Lives Thursday, Full Plate Thursday, Delightfully Inspiring Thursday and Food Trip Friday.

If you enjoyed this post, won’t you consider sharing it with others? Handy share and “Facebook recommend” buttons are below. It really makes my day when you pass things along! To make sure you don’t miss a post or recipe you can either follow Creative Kitchen on Facebook or subscribe by Email in the sidebar. Thanks for reading….I love having company in the kitchen!

17 Comments

Flourless mini lava cakes ~ Secret Recipe Club

Pin It

I’ve got some more exciting news!! I’ve been accepted into a secret club. It’s really the coolest thing, and when I first heard about it last Spring I just knew I wanted to be a part of it. This is my first month participating in the Secret Recipe Club, but I’ll be joining in once a month from now on. When I give you the details, you’ll definitely understand why this would be the coolest thing ever for a food blogger! Every month we receive our assignment….we are assigned another food blog to pour over and pick a recipe from. We cook, photograph and share with you guys. Meanwhile someone is assigned my blog, in which they select and cook a recipe from.

On a select Monday (we are divided into 4 groups because there are so many food bloggers taking part in this neat project), we have reveal day. At the same time all the blogs involved that Monday publish their posts revealing which blog they were assigned, and share the recipe they’ve chosen to make. See….isn’t that the coolest thing ever?? You can see why I’d want to do it right? I mean what could be better than be assigned to READ a food blog. That gives me permission to read every single post if I want. Were you aware that my love of reading food blogs was one of the main reasons I wanted to start my own? I just had to be a part of all the foodie action online given my love of all things food and cooking.

This month I was assigned the blog That Skinny Chick Can Bake!!! First off…what a neat name. I knew I was in for a treat. I had such a hard time trying to decide which recipe to choose. As you can probably guess from the title, Lizzy’s blog is filled with decadent desserts. If you need something special to wow someone, this is the place to go. Most of her recipes also seem simple, but have a huge wow factor. And she has a way of explaining things so it sounds very easy and doable.

But if you think she only blogs desserts, you’d be wrong. Since she has to cook for her family, she also has delicious meal ideas and recipes sprinkled throughout her blog. I was bound and determined to pick something healthy to share with you guys since I know I’ve been a bit dessert heavy lately, but my daughters were hanging around behind me oohing and ahhing over all the goodies on her blog. I hadn’t made a treat for them since the sopapillas a couple weeks ago, so they were really hoping I’d pick something sweet. Pair that with the fact that I haven’t had chocolate in about a week (I’m trying so hard to be good!!), and that these mini lava cakes jumped off the page at me.

If we are going to be naughty, why not choose something portion controlled right? No sense selecting something that would be hanging out here all week calling to me! See? I’m really trying hard here. And I know we all love chocolate. So what’s not to love about chocolate, portion control, easy but with “wow” factor….and I made them flourless for you guys (gluten-free) Cool right? Are we still friends?

After you bookmark this easy recipe, or print it out because my printable recipes work again (yay!!), don’t forget to head over to Lizzy’s blog and check it out yourself. These individual raspberry souffles look amazing too, and you’ll see that her dog makes a regular appearance in her pictures! Also make sure to visit the other bloggers participating in today’s recipe reveal….all their posts are linked up at the bottom of this post.

 Pin It

4.8 from 4 reviews
Flourless mini lava cakes ~ Secret Recipe Club
Author: 
Recipe type: Dessert, Gluten-free
Prep time: 
Cook time: 
Total time: 
Serves: 4
 
This flourless chocolate dessert just melts in your mouth! It's quick, easy and gluten-free!
Ingredients
  • 1 stick butter
  • 4 oz. semi-sweet chocolate chips
  • 2 eggs
  • 2 egg yolks
  • ½ cup sugar
  • ½ tsp. vanilla
Instructions
  1. Preheat oven to 450 degrees.
  2. Butter 4 ramekins (6 to 8 oz. in size)
  3. In a saucepan, melt butter and chocolate over low heat stirring constantly. Then stir in sugar and remove pan from heat.
  4. In mixer, beat 2 whole eggs and an additional 2 egg yolks. Add vanilla and continue mixing.
  5. Very slowly add chocolate mixture into eggs going slow enough to make sure you don't cook the eggs.
  6. Once everything is incorporated well, pour chocolate mixture into all 4 ramekins. Place ramekins on a baking sheet. Bake for 10 minutes and then place on cooling rack.
  7. Cake continues to cook in ramekins so if you want to be sure to have a liquid center you might want to pull out a minute early. It really all depends on your desired doneness. I've had them both ways. If it cooks a tad too long and you have a set center...they are still very good and are more like a chocolate mousse cake or souffle. You really can't mess these up!! Enjoy!!
  8. Serve with homemade whipped cream or fresh berries.

If you enjoyed this post, won’t you consider sharing it with others? Handy share and “Facebook recommend” buttons are below. It really makes my day when you pass things along! To make sure you don’t miss a post or recipe you can either follow Creative Kitchen on Facebook or subscribe by Email in the sidebar. Thanks for reading….I love having company in the kitchen!


27 Comments

The Homesick Texan Cookbook Review

Well our Cookbook Spotlight Series with Lisa Fain’s new cookbook The Homesick Texan has come to an end….it sure went by quickly. I hope you enjoyed getting a sneak peek at her recipes as much as I enjoyed cooking them up for you! If my enthusiasm for this cookbook isn’t evident by now, I’ll just give you a quick recap of our journey.

Week one brought us those amazing Dallas gas station Pork Tacos and Austin-Style black beans. Remember I made a mistake with the chipotle chiles and had to temper the heat?

Week two we indulged in the light and melt in your mouth deliciousness of Sopapillas. Who knew they were SO easy to make at home? And who can forget the Poblano macaroni and cheese….my daughters new favorite mac ‘n cheese.

Week three was blogger’s choice. I sure had a hard time choosing, but eventually settled on a dish I’d never heard of….Migas! Have you tried them yet? I’ve gotten quite addicted to “skillet frying” corn tortillas now.

Just in case you’re wondering, here are some of the recipes still on my list to make that I didn’t get to yet. Don’t these sound incredible?

Chalupas
Tex-Mex Squash Casserole
Chorizo Empanadas
Huevos Rancheros
Chicken Fried Steak with Cream Gravy
Sour Cream Chicken Enchiladas
Tomatillo Jalepeno Jam

and sweets such as:
Pumpkin Empanadas
Kolaches
Shortbread with Lime Zest
Grandma’s Chocolate Pie

All I can say through this journey is Texas gained a new fan. Though I’ve never been, it’s now on my list of must visit places. Over the years I’ve heard so many good things about Texas. I’ve heard Texans are special, and they take great pride in their state. I’ve heard Texas is breathtakingly beautiful! I’ve heard Texas is it’s very own special country within our country.

And through Lisa Fain I’ve garnered an insider’s viewpoint on what it means to grow up a Texan, and always be a Texan at heart no matter where you currently live. Thank you, Lisa for taking us all on a journey to Texas, and helping us learn about your beautiful home state. Congratulations on such a beautiful cookbook!! It’s definitely one I recommend for your cookbook collection. I know I sure treasure my copy! Have you seen it yet? What are your thoughts?

Pin It

If you enjoyed this post, won’t you consider sharing it with others? Handy share and “Facebook recommend” buttons are below. It really makes my day when you pass things along! To make sure you don’t miss a post or recipe you can either follow Creative Kitchen on Facebook or subscribe by Email in the sidebar. Thanks for reading….I love having company in the kitchen!
This post is part of The Homesick Texan Cookbook Spotlight and Cook-Off sponsored by Hyperion and hosted at girlichef

6 Comments

Homemade pimento cheese with a kick

A few months ago I tore a recipe out of a magazine. It was for homemade pimento cheese, and until that time it had never occurred to me you could make it at home. As a kid growing up I loved pimento cheese, but haven’t had it in years. I set the recipe aside in my “to make someday” pile, and went about my summer.

This past labor day weekend I could resist no longer, and I finally had all the ingredients in the house…meaning it was after a cheese stock up at Costco. And since I have a hard time following a recipe, I went online and looked at a few other recipes to get the mayo/cheese ratio down. Once I had that figure in my head, I set to work in the kitchen mixing up what I wanted in my pimento cheese.

Does anyone else cook that way? That’s why I found cooking for the Homesick Texan series to be somewhat of a challenge. It was a welcome challenge because it stretched me…..I learned a lot from it and expanded my cooking knowledge, skills and tastes. It’s good to mix things up! Reproducing someone else’s recipe to the letter is hard for me because at every turn I want to add something I think would taste good, and leave something out that I’m not fond of or leery of. Usually by the time I’m done, it doesn’t resemble the original recipe at all! I wing it, and almost always am very happy with the results. This was one of those times.

I think you’ll love it too since it’s easy to make and very easy to modify to your own tastes. Use any cheeses you want or use the ones I selected. It’s a grown-up version of pimento cheese, and the horseradish adds a nice kick. I love horseradish! You can add more or less as your tastebuds prefer or leave it out altogether. I also added in a teaspoon of bacon grease because you know everything’s better with bacon, but I’m leaving that optional for the vegetarians out there. 🙂 It’s also a good option for those eating low carb. If you want it creamier, just add more mayonaise at the end and continue adding until desired creaminess. It’s the perfect snack for game day!

Before I share the recipe, I just want to mention last month Creative Kitchen was nominated for Best Food Blog over at Parents.com. What an honor! You’ll be happy to hear it’s a “one time” voting contest, and ends on October 15th. It would mean so much to me if you’d take a few minutes and pop over to register your vote. Just click on the purple badge to your right in the sidebar or click here. Thanks so much!!

5.0 from 1 reviews
Homemade pimento cheese with a kick
Author: 
Recipe type: Appetizer, Lunch, Snack, Sandwich
Prep time: 
Total time: 
Serves: 6 to 8
 
Homemade pimento cheese is easy to make and is the perfect choice for a game day snack! It's easy to modify and make your own and low in carbs.
Ingredients
  • ¼ cup mayonnaise
  • small can diced pimentos
  • ¼ cup diced vidalia onion
  • 1 Tbsp worcestershire sauce
  • ½ tsp horseradish
  • pinch sea salt
  • ½ block cream cheese, softened (4 oz)
  • 12 oz of various shredded cheese including:
  • 3 oz muenster
  • 4 oz colby jack
  • 2 oz monterey jack
  • 3 oz pepper jack
  • ½ oz fontinella
  • 1 tsp sugar, optional
  • 1 tsp bacon grease, optional
Instructions
  1. In medium bowl whisk together mayonnaise, pimentos, onion, worcestershire sauce, horseradish, salt and bacon grease and sugar (if using).
  2. Mix in cream cheese and stir until smooth and creamy.
  3. Stir in shredded cheeses and blend well.
  4. Serve as sandwiches, in a wrap or on celery for a low carb meal.


If you enjoyed this post, won’t you consider sharing it with others? Handy share and “Facebook recommend” buttons are below. It really makes my day when you pass things along! To make sure you don’t miss a post or recipe you can either follow Creative Kitchen on Facebook or subscribe by Email in the sidebar. Thanks for reading….I love having company in the kitchen!

Pin It

This recipe is linked up with Fight Back Friday, Slightly Indulgent Tuesday, Fat Tuesday, Hearth and Soul Hop Food Trip Friday.

15 Comments

Ah mazing Migas ~ Homesick Texan Cookbook Spotlight & Cook-off Series

This skillet of Migas couldn’t have come at a better time yesterday. It was a day to go down in the history of strange days…my girls were even commenting on it. It couldn’t possibly have anything to do with my site being hacked, now could it? And what exactly does hacked mean, really? I’m still not sure….but things are all backed up, upgraded, neat, tidy and hopefully secure. But let’s not dwell there….if you know me, then you know I’m not one to mire in the muck so to speak. Chin up and keep swimming, Nemo!

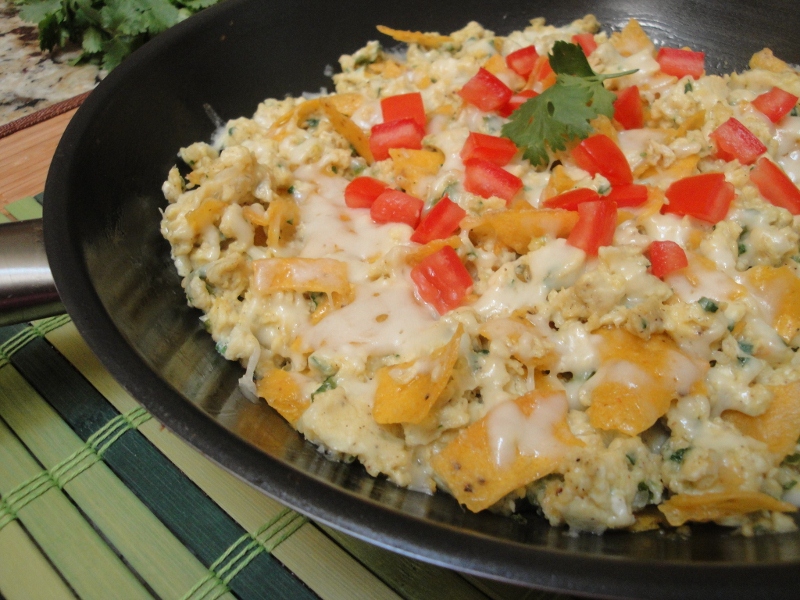
Let’s get back to these Migas! Have you heard of Migas before? I hadn’t before I turned the page in my beautiful new Homesick Texan cookbook. Apparently if you are from Texas, and Austin specifically…..then Migas are a meal not to be missed. Meaning if you’re making a trip to Texas anytime soon…then put this on your list…must try migas! Or better yet, don’t wait to visit Texas….just make ’em at home….today….you won’t regret it!

You know I’ve been enamored of late with my taco omelette with cucumber avocado salsa dip, so it ‘s not too much of a stretch that a breakfast plate of tex-mex would be calling out my name….must make Migas. My girls were curious about their odd name, and I loved the fact that this egg dish would contain crispy fried corn tortilla strips. A google search revealed that there are many variations of this recipe out there, and even a spanish version that’s a different dish altogether.

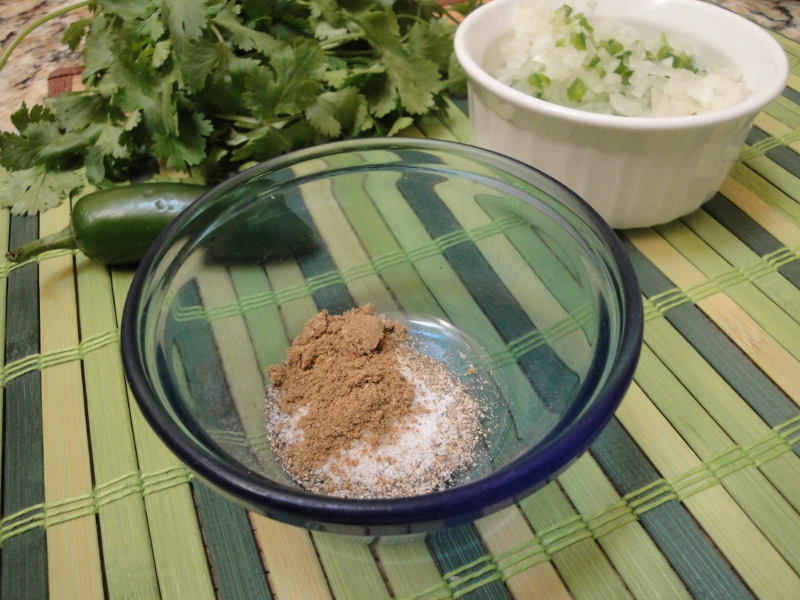
To make Lisa’s tex-mex migas you’ll fry up corn tortillas in a skillet with about 1 inch of oil…about a minute per side, and set aside on paper towels. In a bowl, you’ll mix together eggs, a splash of milk, salt, pepper, cumin and cilantro. In a pan, you’ll saute onion, jalepenos and add in garlic at the end. Then you’ll combine all of it together in a skillet, adding in cheese and fried tortilla pieces at the end.

Serve with chopped tomatoes, salsa, avocado or sour cream and you’re all set. See I told you, easy! My girls scraped their plates clean and wanted more, my hubby thought they were incredible, and I’m so happy to add another meal to my rotation that everyone loves!

Let me know if you try them, if you live in Texas or about any experience you have with migas!

 Migas ~ 4 servings
slightly adapted from The Homesick Texan Cookbook by Lisa Fain

Oil, for frying
4 corn tortillas cut into strips (I used 6)
1/2 medium yellow onion, diced (I use vidalia)
4 jalepeno chiles, seeds and stems removed, diced (I used 1 jalepeno)
8 eggs
1/4 cup whole milk or half-and-half (I used cream)
1/2 tsp kosher salt, plus more, to taste
1/2 tsp black pepper, plus more, to taste
1/2 tsp ground cumin
1/4 cup chopped cilantro
2 cloves garlic, minced
1 cup grated cheddar cheese or monterey jack cheese (4 ounces) (I used jack)
Salsa, for serving
Warmed-up tortillas, for serving (we omitted and ate off our plate)

1. Fry up corn tortillas in about 1 inch of oil, about 1 minute per side. Drain on paper towels and lightly salt.

2. Saute onions and jalepenos in lightly greased skillet (I used butter) til onions are translucent, about 5 minutes. While onions are cooking, whisk eggs in a bowl with milk, salt, pepper, cumin and cilantro.

3. Add garlic to skillet and cook for 30 more seconds. Add the egg mixture, and let eggs sit 1 minute on medium low heat or until set on bottom. Stir gently with spatula. Continue scraping bottom of skillet till eggs are cooked, sprinkling in cheese near the end. Once cheese has melted stir in tortillas pieces and top with more cheese. I placed my skillet under the broiler for 1 minute more to melt cheese on top, but it’s not a necessary step.

4. Salt and pepper to taste. Serve eggs with salsa and tortillas, if desired. Can also top with tomatoes, avocado and/or sour cream.

If you enjoyed this post, won’t you consider sharing it with others? Handy share and “Facebook recommend” buttons are below. It really makes my day when you pass things along! To make sure you don’t miss a post or recipe you can either follow Creative Kitchen on Facebook or subscribe by Email in the sidebar. Thanks for reading….I love having company in the kitchen!

This post is part of The Homesick Texan Cookbook Spotlight and Cook-Off sponsored by Hyperion and hosted at girlichef

This recipe has been linked up with Slightly Indulgent Tuesday, Fat Tuesday, Totally Tasty Tuesdays, Hearth and Soul Hop, Fresh Bites Friday, Food Trip Friday, Friday Favorites & Simple Lives Thursday.

Related Posts Plugin for WordPress, Blogger...
17 Comments