Taco pizza

20130210-081928.jpg
A couple weeks ago I was craving something fresh, light and spicy, but also craving pizza. Especially my homemade pizza crust. So I set my kitchen aid mixer to work on the pizza dough, browned up some taco meat and started chopping up my toppings. Don’t forget about my homemade taco seasoning…so quick & easy to mix up!

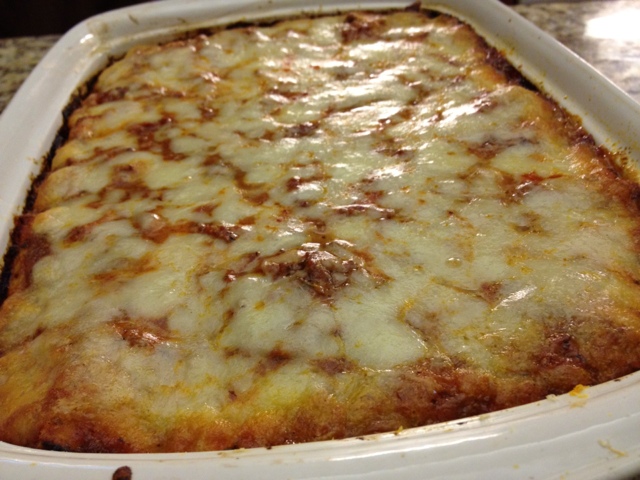
I preheated my oven to 550…you know with pizza, the hotter the better. Did you know those pizza ovens are around 900 degrees? Sure wish I had one of those! Remind me to tell you about my oven saga this past week. If you follow me on Instagram, then you already know. When your dough is ready, spread it with your favorite (or homemade) salsa. Then sprinkle with shredded mexican cheese and a small amount of taco meat. Bake it for 5-8 minutes (or longer if your crust is thick) until cheese is bubbly and crust is done.

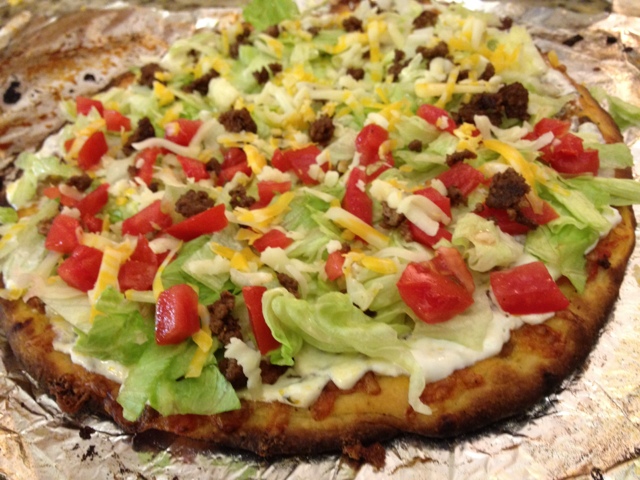
Remove from oven and spread with sour cream. My favorite is Daisy, full fat of course! Add chopped lettuce, tomatoes, an abundance of taco meat and a little more shredded cheese. Optional toppings like green onions, black olives, jalepenos and more salsa can also be added. Whatever you like on your tacos, add it on. Slice and eat! I like mine with crushed red pepper flakes. There’s only one issue with this pizza….it’s hard to stop eating. 😉

Homemade pizza is one of my favorites: If you haven’t seen these, be sure to check out my Bruschetta Pizza, Fresh Mex Flatbread Pizza, Easy Flatbread Pizzas and Berry Crumble Dessert Pizza. What are your favorite pizzas?

Taco pizza
Author: 
Recipe type: Pizza, Dinner, Appetizer, Mexican
Prep time: 
Cook time: 
Total time: 
Serves: 2
 
Ingredients
  • Pizza crust
  • Salsa
  • Ground beef
  • Taco seasoning, homemade
  • Lettuce, chopped
  • Mexican cheese, shredded
  • Tomato, diced
  • Sour cream
  • *Any other favorite taco fixin's
Instructions
  1. Preheat oven to 550.
  2. Using store bought or homemade, stretch out your pizza dough on foil greased with olive oil. This is the method I use so that I can slide my foil right on top of my pre-heated pizza stone. Or you can use a pizza pan or cookie sheet if not using a pizza stone. I get a really crispy crust this way.
  3. Spread dough with salsa. Then add shredded mexican cheese and a small amount of taco meat reserving some to top pizza with.
  4. Bake for 5 - 8 minutes until crust is cooked through. Time will vary depending on the thickness of your crust.
  5. Remove from oven. Spread with sour cream, top with lettuce, tomato, more cheese and taco meat. Sprinkle with crushed red pepper or salsa.
  6. VEGANS - My homemade crust is vegan. Just omit sour cream, taco meat and cheese.
  7. VEGETARIANS - Just omit taco meat.


If you enjoyed this post or recipe, please pass it along! There are many ways you can SHARE. One of the most popular options is to PIN it on Pinterest or to LIKE it on Facebook. It really makes my day! To make sure you don’t miss a post or recipe you can either follow Creative Kitchen on Facebook or Pinterest. Or subscribe by RSS subscription or Email in the sidebar. It’s FREE! Thanks for reading….I love having company in the kitchen!

3 Comments

Food intolerances, elimination diets and trying to figure out what to eat

How are your healthy living goals coming along? Have any of you checked out My Fitness Pal yet? January was a great month for me, and I lost about 4.5 pounds in 2 weeks! Yay!! The accountability of meeting up with friends on My Fitness Pal has been very helpful! Especially now that I’m okay with having my “food diary” viewable by my friends. I love getting ideas from others by reading their diary also. Come on, be brave…..you can do it! 😉

I used to worry about sharing my food diary with you guys because I consider myself a “REAL” food enthusiast! I don’t eat fast food, and I stick with mostly natural ingredients, but if you take a look at my food diary you will see I’m not perfect and I definitely eat sugar….sometimes more often than others. Lately I need to increase my veggie and fruit intake. I used to eat a lot more fruits/veggies and a lot less carbs, but last summer I realized I have some sort of allergy or food intolerance. I went on an elimination diet to figure out what it was.

It was at that time I realized that certain foods made my stomach happy and felt good digesting them (that’s when I discovered Ray’s Plain New York bagels….a huge new treat for me!). I realized I have to limit my fruit and veggie intake to smaller portions at separate meals and not all grouped up together. I discovered that I can still eat wheat (whew!!) and gluten, most dairy (yay butter!), and eggs. Sadly I can’t eat potatoes or sweet potatoes (if I do I have to limit quantities), and I also can’t have some of the new fangled “healthy” sweeteners like “evaporated cane juice” which seems to be in everything. I need to stay away from corn syrup, high fructose corn syrup, corn syrup solids and a lot of the new terms for sugar that are out there. High fructose corn syrup is something I try to stay away from anyway.

The less processed the food is, the better. Which is why I started baking more so I can have more treats without side effects. I’m all about eating REAL food, and I’ve always strived to keep the ingredients list to a minimum so figuring this out has given me another reason to stay away from processed foods. But the bummer is, it’s really put a damper eating fruit and veggies with wild abandon. It’s so strange to change my thinking on this….to me FRUIT and VEGETABLES equals HEALTHY, and that’s still true. But it’s so bizarre to wrap my mind around the fact that I can’t eat as much of them as I want, whenever I want. Thankfully, at least I’ve found I can eat most of them….I just need to watch my portions and not have them all in the same meal.

I haven’t quite figured out what I have….maybe it’s just certain food allergies. But at first Fructose Malabsorption seemed to be likely. I used the FODMAPS elimination chart to try and figure out what I can and can’t eat. I learned the fructose content of all the foods, and it’s certainly helped me immensely. I’m still not sure what I have, but at least I’m feeling A LOT better! I used to get stomach pains and swell after eating certain foods. It finally got so bad last summer that I had to figure it out.

Have you experienced anything like this? I’d love to hear from you. Have you heard of Fructose Malabsorption? Fodmaps? Did you get tested for food allergies? Would you recommend that?


If you enjoyed this post or recipe, please pass it along! There are many ways you can SHARE. One of the most popular options is to PIN it on Pinterest or to LIKE it on Facebook. It really makes my day! To make sure you don’t miss a post or recipe you can either follow Creative Kitchen on Facebook or Pinterest. Or subscribe by RSS subscription or Email in the sidebar. It’s FREE! Thanks for reading….I love having company in the kitchen!

8 Comments

The 106 calorie banana oat muffin ~ quick, easy and multigrain!

Hi there! I’ve missed YOU. Like so many areas in my life lately, I’m striving to find a balance with blogging. My intention is to step up the game because this is a huge creative outlet for me. And like cooking, I find such pleasure in coming here and sharing with you guys. Sometimes you’re SO quiet that if it weren’t for traffic stats, it’d be hard to believe you are there….on the other side of the screen reading. 😉

Lately in my kitchen I’ve been creating recipes with calorie counts in mind. While shedding a few holiday pounds, I’ve wanted to be more mindful of portion control and trying not to get into trouble when baking especially. So the other weekend I found myself with some bananas that needed using (when don’t we have ripe bananas laying around?), and I got excited thinking about ways to make this a lower calorie muffin. You may have noticed I’ve been calorie counting over at My Fitness Pal, and though that might sound stifling or boring to most….My Fitness Pal makes it FUN, and I’ve met up with friends there which keeps us all accountable.

20130130-133741.jpg
So back to these banana muffins. Muffin making is EASY! I’ve told you before that muffins are basically fail proof. You just start with a basic formula and add and subtract ingredients as you want. Now I plug them in to a recipe builder along the way to see how it adjusts the calories per muffin. This has been such a neat way to explore my baking creativity. Not to mention all the homemade goodies that are so much better for me and my family than store bought.

These banana oat muffins are lighter than your typical muffin, but are full of flavor and are perfect to take on the go. My girls devoured them, and they’ve been great for snacks and desserts as well as breakfast. Do you have a favorite “lighter” muffin recipe? Have you ever used the recipe builder? What are your favorite muffin flavor combinations? Hope you’ll speak up….I’d kinda like to know you’re there.

20130130-133831.jpg

Easy reduced calorie multigrain banana oat muffins
Author: 
Recipe type: Muffins, Breakfast, Snacks
Prep time: 
Cook time: 
Total time: 
Serves: 14
 
These banana oat muffins are lighter than your typical muffin, but are full of flavor and are perfect to take on the go. My girls devoured them, and they've been great for snacks and desserts as well as breakfast.
Ingredients
  • 1½ cups freshly ground oats (I use my coffee grinder/you can use a blender also)
  • ½ cup all-purpose unbleached flour
  • ⅓ cup sugar
  • 1 Tbsp baking powder
  • ½ tsp sea salt
  • 2 bananas mashed well
  • 1 tsp pure vanilla
  • ½ cup whole milk
  • ½ cup water
  • 2 Tbsp softened or melted butter
  • 1 egg
Instructions
  1. Preheat oven to 400 degrees.
  2. Butter muffin pans.
  3. In a large mixing bowl, mix by hand flour, sugar, baking powder and salt.
  4. Add in bananas, egg, vanilla, butter, milk and water.
  5. Stir until just combined. Batter should be somewhat lumpy. Over-stirring will create a tough muffin.
  6. Using a ice cream scooper, scoop barely one scoop of batter into each muffin tin. Batter will be about ⅔ of the way up the tin.
  7. Bake for about 15-20 minutes keeping a close eye near the end. Muffins are done when a toothpick inserted comes out cleanly.
  8. Cool on a cooling rack. Eat warm sliced in half with a little bit of butter.
  9. Makes 14 muffins.
  10. CALORIE INFORMATION: 106 calories per muffin, 2.8 grams fat, 1.4 grams fiber, 7.4 grams sugar, 2.5 grams protein, 18.4 carbs.
  11. WW POINTS PLUS: 3 points per muffin


If you enjoyed this post or recipe, please pass it along! There are many ways you can SHARE. One of the most popular options is to PIN it on Pinterest or to LIKE it on Facebook. It really makes my day! To make sure you don’t miss a post or recipe you can either follow Creative Kitchen on Facebook or Pinterest. Or subscribe by RSS subscription or Email in the sidebar. It’s FREE! Thanks for reading….I love having company in the kitchen!

2 Comments

Lasagna with Homemade Lasagna Noodles ~ Secret Recipe Club

20130115-230703.jpg
Excited to share this recipe with you guys as it was a BIG hit here at my house! It also made enough for leftovers. This month I had the pleasure of perusing Mother Thyme for the Secret Recipe Club. Jennifer is a mom of twins that loves combining fresh ingredients with food she already has on hand. As usual, I bookmarked many recipes from her site that I can’t wait to try: Chicken Parmesan Rice Bake, Pizza Dip and Pineapple Banana Juice

20130115-230739.jpg
This lasagna caught my eye for two reasons….one, I LOVE lasagna….and two, it promised HOMEMADE NOODLES!! I’ve made homemade pasta before when I tried my hand at egg noodles, and I remembered it was EASY! It is….so don’t let that scare you off. Have you noticed a pattern with the Secret Recipe Club recipes I choose? Lately it’s been either pasta or chocolate.

So gain confidence in the kitchen by giving these homemade noodles a try, and make sure you check out Mother Thyme!

20130115-230820.jpg

Lasagna with Homemade Lasagna Noodles ~ Secret Recipe Club
Author: 
Recipe type: Italian, pasta
Prep time: 
Cook time: 
Total time: 
Serves: 12
 
Ingredients
  • LASAGNA NOODLES:
  • 4½ cups unbleached all-purpose flour
  • 6 eggs
  • 1 tsp sea salt
  • 6 Tbsp water, room temperature
  • LASAGNA:
  • 1½ pounds ground beef
  • ½ tsp sea salt
  • ½ tsp pepper
  • ¼ tsp garlic powder
  • 32 oz. ricotta cheese
  • 2 eggs
  • 2 cups mozzarella, shredded and divided
  • 1½ cups parmesan cheese
  • ¼ tsp sea salt
  • ¼ tsp pepper
  • Fresh lasagna noodles (above) or 1 box lasagna noodles
  • 24 oz pasta sauce
Instructions
  1. LASAGNA NOODLES:
  2. In mixer, combine all ingredients until combined. Remove dough and knead to form a ball. Set aside and let rest for about 30 minutes.
  3. Place dough on clean, lightly floured surface. Roll out with rolling pin until desired thickness. Trim rough edges and cut into equal 2 inch wide (or desired width) strips. Gather unused dough and edges, knead and roll out additional strips.
  4. Set fresh noodles aside until ready to use. (I didn't roll mine out until after I'd made my sauce, and cheese mixture).
  5. PREPARE LASAGNA:
  6. Preheat oven to 350 degrees.
  7. In a large skillet on medium high heat combine ground beef, ½ tsp salt, ½ tsp pepper and garlic powder and cook thoroughly. Remove from heat and stir in pasta sauce until combined and set aside.
  8. In a large bowl, combine ricotta cheese, 1½ cups mozzarella cheese, eggs, parmesan cheese, ¼ tsp salt, and ¼ tsp pepper and stir until blended.
  9. In a 9x13 pan spread a light layer of sauce. Then add first layer of noodles. Add a layer of ricotta mixture. Repeat with sauce, noodles and cheese again. Repeat a third time saving enough sauce to cover top of lasagna.
  10. Cover with foil and bake for 40 minutes.
  11. Remove foil and add remaining mozzarella cheese, adding extra if desired.
  12. Bake for an additional 20 or so minutes until cheese is melted, bubbly and noodles are cooked through.
  13. **** Each piece of lasagna (if you cut into 12 pieces) was roughly 400 calories. ****


If you enjoyed this post or recipe, please pass it along! There are many ways you can SHARE. One of the most popular options is to PIN it on Pinterest or to LIKE it on Facebook. It really makes my day! To make sure you don’t miss a post or recipe you can either follow Creative Kitchen on Facebook or Pinterest. Or subscribe by RSS subscription or Email in the sidebar. It’s FREE! Thanks for reading….I love having company in the kitchen!


11 Comments

Need healthy living motivation & accountability? Join us!!

You want in on a little secret? I have something exciting to share with you! It’s something you guys can jump in on if you have a few holiday pounds to lose, have set weight loss goals for yourself or need some encouragement and accountability in meeting your goals. I’ve been joining in with an incredible group of ladies over my friend Kim’s blog each week. Kim started up a weight loss and encouragement group over at her little place in cyberspace….At Home with Kim. Kim is such a natural motivator, is super friendly and created a Facebook page where we could all meet and share with one another.

It’s evolved into a place where we share photos of our meals to give ideas to each other, share tips to encourage each other, and report our fitness and weight loss goals. I love that notifications pop up on my phone throughout the day from this group because it’s a reminder to me of what I’m striving for.

My healthy living goals are:

1) To fit in exercise 3 times a week ~ exercise can be FUN!
2) To drink 6-8 glasses of water a day
3) To track my food intake over at My Fitness Pal ~ to stay within the calorie count I’ve set for myself in order to learn and stay within portion control.
4) Increase my fruit and vegetable intake while learning what foods my body can tolerate and stay away from the foods it can’t*
5) Lose 8 pounds and strive to keep it off

A few of my new weight loss friends are also over at My Fitness Pal, as well as many “in real life” friends. It’s been neat to share and view each other’s food diaries. It gives us food ideas. I’ve told you about My Fitness Pal before. You can join up on their website, but they also have an app for your smartphone, ipod touch or ipad. You track all the food you eat, and set a calorie goal that you want to meet but not exceed each day. I set my calorie goal at 1,300 calories a day which should give me a 1-2 pound loss a week, and I am SHOCKED and DELIGHTED at how much food that actually is! But the key for me is eating REAL food. I eat full-fat, use butter and I believe that’s the key in staying full from my meals.

If you’re over there, let me know so we can friend each other!! Oh yeah, and don’t worry….it doesn’t share your weight with your friends, and you can opt to keep your food diary private. I’ve opted to have my food diary open to my friends because it makes it more fun, and gives me new ideas. 😉

So what do you think? What are your healthy living goals? Want to join us? Just let me know in the comments if you want to join in, and then head on over to Kim’s site and say Hi! And remember….let me know if you’re on My Fitness Pal, and want to friend each other there. Come find me….I’ll be looking out for you!

* I’ll be sharing my food tolerances and intolerances in an upcoming post! I’m curious to hear others journeys with food intolerances. Also, this Monday is Secret Recipe Club time….so check back for a new recipe on the site!

If you enjoyed this post or recipe, please pass it along! There are many ways you can SHARE. One of the most popular options is to PIN it on Pinterest or to LIKE it on Facebook. It really makes my day! To make sure you don’t miss a post or recipe you can either follow Creative Kitchen on Facebook or Pinterest. Or subscribe by RSS subscription or Email in the sidebar. It’s FREE! Thanks for reading….I love having company in the kitchen!

Related Posts Plugin for WordPress, Blogger...
4 Comments