Tropical green smoothie

Tropical Green Smoothie
How’s your summer going? The days have been hot, but living in South Florida the coastal breezes sure help us to keep cool. That and the fact that we head to the beach and pool a lot. Lately we’ve even met friends at the local “mini” waterpark. I call it “the waterpark” but my girls are quick to let me know that it’s not a real waterpark. Hey…in my mind 3 big tunnel slides, a rock climbing wall, a diving board, a splash area and a playground IN water is a lot more waterpark than I had as a kid!! Yes….waterpark!

Summer Fun
These pictures don’t even do the “waterpark” justice….you can’t see the other 2 big slides, and you also can’t beat the “mini” price. It’s only $3 a person for residents. Can’t beat that!!

Swim test
I have to brag for a quick minute on my little tadpole……this was her first summer taking the swim test at the waterpark. If you don’t pass the swim test, you don’t get to go down the amazing big slides or jump off the diving board. She totally suprised me and passed it on her first attempt EVER!! I’m so proud of her!

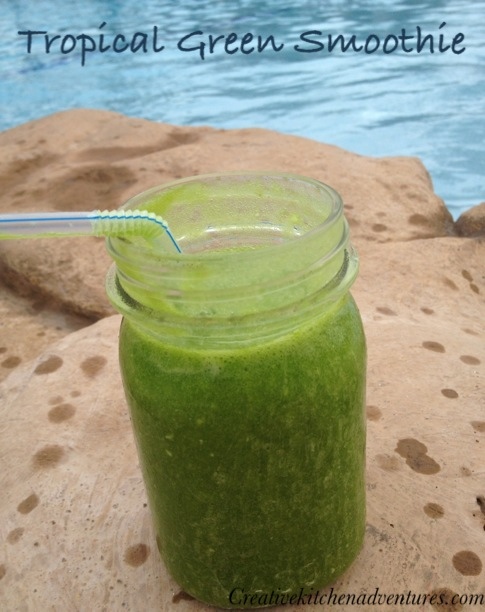
I’ve been meaning to share with you all some of my favorite green drinks….as in juicing and green smoothies. Today I’m finally sharing my favorite green smoothie this summer. If you’re not into green smoothies yet, please don’t let the green color fool you. You DO NOT taste the green….you DO NOT taste the organic baby spinach…..I PROMISE!! It just gives you a really cool color, and a lot of protein and energy. Green smoothies are the ultimate energy drink! TRY IT!!

What makes this particular green smoothie tops with me is the tang of grapefruit juice. If you’re not a fan of grapefruit, use lemon juice. Either way, it gives you a nice refreshing kick to your tastebuds. I’m not an exact measurer with these things. I eyeball it….but I’m putting it down in measurements for you guys. If you’re like me, and you feel comfortable moving things around, or replacing things…by all means, do so! I haven’t made a smoothie yet I didn’t like! And they are very forgiving….if it’s not exactly the taste you’re going for you can just add more fruit. 😉

A good friend of mine is hoping to start venturing back into trying the green smoothie again. I hope this recipe gives her a good start. Make sure you use frozen fruit as it makes your smoothie more frosty and therefore more fun to drink. I don’t use ice in my smoothies because we don’t have our ice maker hooked up, but if you have ice…then feel free to sub out some of the fruit for ice. It will taste just as good and stretch your fruit (aka save money!!) I’m thinking we need to hook ours up soon.

What are your favorite smoothie combinations? Have you braved the “green” smoothie yet?

Tropical Green Smoothie

Tropical green smoothie
Author: 
Recipe type: Smoothie, Snack, Breakfast
Prep time: 
Total time: 
Serves: 5
 
Ingredients
  • 2 cups water
  • 2 -3 cups baby organic spinach, loosely packed
  • 2 cups frozen pineapple chunks
  • 2-3 frozen bananas
  • Juice of one grapefruit or one large lemon
  • 1 - 2 Tbsp unsweetened shredded coconut, optional (added at the very end)
Instructions
  1. ** You can make this in any decent blender (usually glass container), but it's imperative that you liquify the spinach in the water first before adding frozen fruit.**
  2. Add 2 cups water to blender or Vita-Mix.
  3. Add in spinach.
  4. Blend until spinach is liquid.
  5. Add in frozen pineapple and blend well.
  6. Add in frozen bananas and blend well.
  7. Squeeze in grapefruit juice or lemon juice.
  8. Blend pitcher well.
  9. If adding coconut, do it at the very end and don't overmix. I like the texture of the coconut in the smoothie as it gives me a bit of a chew to the smoothie.
  10. ** This makes a LARGE pitcher of smoothie which is enough for my family of 5. Or enough for 2 days for my hubby and me. You can cut recipe in half for 2-3 servings.**
  11. ANOTHER TIP: I pour these into half quart mason jars and screw the lids on and store in fridge. Smoothie will keep 2 days, and packs well for lunches or on the go. Just shake well and add a straw.


If you enjoyed this post or recipe, please pass it along! There are many ways you can SHARE. One of the most popular options is to PIN it on Pinterest or to LIKE it on Facebook. It really makes my day! To make sure you don’t miss a post or recipe you can either follow Creative Kitchen on Facebook or Pinterest. Or subscribe by RSS subscription or Email in the sidebar. It’s FREE! Thanks for reading….I love having company in the kitchen!

8 Comments

Blueberry muffins {Secret Recipe Club}

20130721-112951.jpg
How’s your summer going? I’m in disbelief that we’re already halfway through July. We’ve been having an amazing summer….the beach, the pool, the waterpark, friends, free movies, vacation, cookouts and more! I love the relaxed pace of summer….not having to be be on set schedules, but we’ve formed somewhat of a new schedule. I love that we have even more time to be spontaneous….many times those are the best get togethers with friends! Have you noticed that?

It’s Secret Recipe Club time again. This month I was assigned Cookin’ With Moxie. Jamie’s blog was so much fun to read through. She has such a zest for life, family, friends and of course…cooking. I always have such a hard time choosing just one recipe. I know I have this issue every month. This month I really wanted to try this Cranberry Coffee Cake and also this Spaghetti El Limone….but in the end these Super Large Blueberry Muffins won out. And all 3 of my girls and one of their friends were glad they did!

These blueberry muffins are made with sour cream. You can’t taste it (my girls were thankful for that!) but I believe it’s what added a certain richness. These muffins are so moist and sweet, and I love the crumb! They are addicting so make sure you make them when you have a gathering so you aren’t tempted to eat the whole batch.

4.7 from 3 reviews
Blueberry muffins {Secret Recipe Club}
Author: 
Recipe type: Breakfast, Muffin
Prep time: 
Cook time: 
Total time: 
Serves: 12
 
Ingredients
  • 2 cups all-purpose flour (unbleached) or use ww flour
  • 1 Tbsp baking powder
  • ½ tsp sea salt
  • 1 egg
  • 1 cup granulated sugar
  • 4 Tbsp melted butter
  • 1¼ cups sour cream (I used Daisy)
  • 1½ cups frozen or fresh blueberries (I used frozen organic)
Instructions
  1. Preheat oven to 350 degrees.
  2. In a medium bowl, mix together flour, baking powder and salt.
  3. In mixer, whisk egg for about 30 seconds.
  4. Add sugar and whisk for another 30 seconds on a high speed until thick.
  5. Add melted butter in two additions, whisking to combine after each addition.
  6. Add the sour cream in 2 additions and whisk to just combine.
  7. Add the blueberries to the dry ingredients and gently toss to combine.
  8. Add the sour cream mixture and fold with a rubber spatula until the batter comes together. Small spots of flour may remain and the batter will be thick. Do not overmix.
  9. Using an ice cream scoop, fill a greased muffin tin.
  10. Bake until light golden brown and a toothpick comes out clean about 30 to 35 minutes.
  11. Let cook in muffin tin on cooling rack for at least 5 minutes.
  12. ** Makes 12 extra large muffins **


If you enjoyed this post or recipe, please pass it along! There are many ways you can SHARE. One of the most popular options is to PIN it on Pinterest or to LIKE it on Facebook. It really makes my day! To make sure you don’t miss a post or recipe you can either follow Creative Kitchen on Facebook or Pinterest. Or subscribe by RSS subscription or Email in the sidebar. It’s FREE! Thanks for reading….I love having company in the kitchen!

[inlinkz_linkup id=286419]

13 Comments

Easy cinnamon sticks…a type of dessert pizza

Cinnamon dessert pizzaThis morning I took my girls to see one of the free summer movies and we met a bunch of friends there. We saw “Rise of the Guardians” which turned out to be a really neat movie. Afterward, as we waited for the monsoon to clear (frequent summer rains in Florida…coming down sideways), I was chatting with my friends Robin and Rosa. It was then that I realized (yet again!) something I love hadn’t yet met made it on the blog. I shouldn’t be surprised….there’s really not enough time….I have backlogs of recipes and pictures and food ideas to share with you!

But I still can’t believe I haven’t shared these cinnamon sticks with you yet! They are SO good and super EASY! You know how much I love homemade pizza….you might remember a few of my favorites like bruschetta pizza with fresh mozzarella or easy flatbread pizzas. But as much as I love these pizzas, it’s the crust that begs me to do more and one night I did! 😉

I really, really get into trouble though with my homemade pizza crust. You see when I’m done making pizzas, I take the leftover section of dough, press it out and put in the oven for about five minutes. Then I pull it out, grab a stick of butter and coat the crust with it. Next I sprinkle it all over with cinammon sugar mixture and put it back in the oven until it gets nice and crispy and perfect.

When I pull it out and cut it into cinnamon strips of warm sugary goodness, the entire house swarms around and gobbles it up. I’m in real trouble though if I make it when my girls aren’t in the room because it’s so good I could easily eat it ALL myself (not that I have or anything lol). Yes….super addictive! Which makes it hard for me to make my pizzas regularly because I know what little self control I’ll have. Which explains my lack of a good photo….they go so fast I was lucky to snap this one right before we sliced them up and dug in!

Pizza nights are truly satisfying, but sometimes I just go too far. You have to make this the next time you make homemade pizzas, and tell me you can put it down after just one strip. What are some quick addictive desserts you’ve invented?

5.0 from 1 reviews
Cinnamon sugar dessert pizza
Author: 
Recipe type: Dessert, Snack
Prep time: 
Cook time: 
Total time: 
Serves: 5
 
Ingredients
  • Pizza dough
  • Cinnamon sugar
  • Butter
Instructions
  1. Preheat oven to 500 or the hottest your oven will go.
  2. Press out your dough to desired thickness and shape.
  3. Bake on greased pizza pan or greased foil on baking stone.
  4. Bake for 5 minutes.
  5. Remove pizza crust from oven and rub all over with a stick of butter. The butter will get all melty.
  6. Sprinkle cinnamon sugar over the entire crust and return to oven. Bake until desired crispness.
  7. Slice into strips and enjoy!


If you enjoyed this post or recipe, please pass it along! There are many ways you can SHARE. One of the most popular options is to PIN it on Pinterest or to LIKE it on Facebook. It really makes my day! To make sure you don’t miss a post or recipe you can either follow Creative Kitchen on Facebook or Pinterest. Or subscribe by RSS subscription or Email in the sidebar. It’s FREE! Thanks for reading….I love having company in the kitchen!

5 Comments

Chicken and cheese quesadillas & toaster oven LOVE!

Chicken & cheese quesadillas

Ever looking for something easy to feed the kids? A meal that will satisfy you and hubby but isn’t long and involved, and will leave you with a lot of time left in your evening? These quesadillas are perfect for a night you don’t feel much like cooking, but still gives that wow factor for your children. Sometimes I feel funny calling these types of meals recipes because really it’s just a food idea.

These chicken and cheese quesadillas can be made with leftover chicken, a rotisserie chicken you pick up on the way home or the way I go about it….just a quick 30 minutes in my Kenmore elite convection toaster oven, and I have baked chicken ready for any recipe or to eat as is. I haven’t had a chance to tell you about my new toaster oven. Of course by now I’ve had it for over a year ever since my first Kenmore trip to Chicago. We were able to select a small appliance, and then were gifted with it. While many wanted the Kenmore stand mixer….I’d had a good quality toaster oven on my list for quite some time.

I have to say this kitchen appliance has revolutionized my life! Not an understatement. Especially in the heat of summer as we’re in now….I go MANY days without turning on my conventional oven. I’ve been wanting to share mine with you for a long time. Do you have a toaster oven? Have you ever wanted one?

20130713-104350.jpg
I use mine for everything….toast (put away my regular toaster), heating up all leftovers without the mushiness you get from the microwave, baked potatoes, anything you would broil in the oven I broil in my toaster oven….nachos (easy for my kids to make in the toaster oven!), quesadillas, tostadas, etc. I also bake chicken…it’s so easy to pop in my chicken breasts, hit bake at 350 and 30 minutes later I have perfectly cooked chicken breasts. It’s the only way I make bacon anymore. SO EASY!!

I just cut bacon in half and place it on a rack…all the grease drips down and the bacon gets nice and crispy. It only takes 2 times through the 15 minute broil function. In 30 minutes I have perfectly cooked bacon while I go about making biscuits or pancakes. It’s how we make all our bacon for our camping trips. I broil portabella mushroom caps, make all kinds of easy snacks for the kids, and it’s an easy way for them to learn to cook. I LOVE MY KENMORE ELITE CONVECTION TOASTER OVEN!!

So back to these quesadillas. You can make them in your toaster oven under broil and flip them halfway through (healthier way and easy for kids to do), or you can add a little oil in a skillet and pan fry them up a bit for a bit more of a restaurant type of quesadilla. I just add taco seasoned sliced chicken and shredded colby jack cheese. I serve them topped with chopped lettuce, tomato and scallions. We pull out sour cream and hot sauce for dipping. It’s a quick, easy and healthy meal for my girls on a night I don’t want to invest a lot of thinking into our meal. It’s a hit too!

Disclaimer: Though Kenmore provided me with the Kenmore Elite convection toaster oven, all opinions expressed in this post are my own.

5 Comments

Back from vacation

Leaving FloridaWe’re back from a much needed extended family vacation to North Carolina. We left Florida Friday morning June 21st and just got back this past Sunday June 30th. Upon arriving back home….part 2 of our family vacation started as my inlaws arrived Monday afternoon and just left yesterday. What an incredible 15 days it’s been. Ever notice how vacations feel longer than they are? I’m sure it has something to do with being out of your normal routine and responsibilities, maybe also visiting with family and friends you haven’t seen in awhile. It’s wonderful, refreshing and the memories we’ve built as a family during these times are priceless.

I always miss my kitchen when I’m away. It’s not that I don’t enjoy a good meal out, but for most of the meals while I travel I prefer eating in. I like the control that offers me, and love eating more of my normal healthier fare while traveling. The last few summers I’ve noticed that I feel SO much better when I travel if I start my day with a quality breakfast of my choice along with a quick run and walk. It may not undo all the damage from the vacation fluff that inevitably finds it’s way onto me, but it sure has helped to combat it. 😉

This past trip I managed to get out for a 1 to 1.5 mile walk and a 1 mile run EVERY morning while gone. Even the morning after my cousin’s wedding. Wow….that was awesome! I’m not saying it was easy every morning, but I liked getting up before everyone else and just getting it done! I found it to be a great way to capture some time for myself before the hustle of the day began. I liked the energy it gave me, and the best feeling was that I didn’t feel sluggish at all.
20130706-182650.jpgAnother huge plus of running while away was that I was able to get out and explore a different area. We were visiting family and friends in North Carolina and it was a nice change of scenery….instead of palm trees and flat land, I ran in a somewhat hilly neighborhood and loved seeing all the gardens, front porches and older buildings. It was a more rural feel for parts of it, and also led into a newer neighborhood of cute houses. Not to mention I was back in my old neighborhood, and I’m usually not out exploring on foot.

A few highlights from my trip include a family wedding, our annual Fourth of July family reunion (early) which also meant seeing my nephews (identical two year old twins) who I hadn’t seen since last July and another cousin I hadn’t seen in 2 years, hiking and mountain views, great meals out with family and friends (tried to get my fill of FRIED GREEN TOMATOES!), Krispy Kremes of course, exploring Old Salem and my first ever trip to Trader Joe’s!! I have to save that for it’s own post! Did you happen to see my pictures on Instagram? It’s great to be back sharing with you guys, and I hope your summer’s been wonderful so far. I have some pictures from the trip, some fun things to share with you and always new recipes and food ideas. So much to share….so little time, but keep checking because I’m back.

I’m always looking for new travel ideas, especially involving food and fitness. Do you like to try to incorporate exercise into your travels and vacations? What works for you? I want to hear from you!
20130706-182004.jpg
Pilot Mountain in the distance. A hometown landmark for me, and my first time taking my girls. We hiked around the pinnacle! Fun, but some scary parts and drop offs.

If you enjoyed this post or recipe, please pass it along! There are many ways you can SHARE. One of the most popular options is to PIN it on Pinterest or to LIKE it on Facebook. It really makes my day! To make sure you don’t miss a post or recipe you can either follow Creative Kitchen on Facebook or Pinterest. Or subscribe by RSS subscription or Email in the sidebar. It’s FREE! Thanks for reading….I love having company in the kitchen!

Related Posts Plugin for WordPress, Blogger...
2 Comments