Chocolate chip cookie dough balls {Gluten-free}

Chocolatechipcookiedoughballs

I’m excited to share my first recipe here in awhile, and this is just the first of many! I’ve had so much fun experimenting with gluten-free baking over the summer, and have an awesome gluten-free chocolate chip recipe to share with you soon. But for now these will have to tide you over.

There’s just something about chocolate chip cookie dough, isn’t there? Experience has told me I’m not the only one who can’t keep her hands out of the batter while making chocolate chip cookies. My family pretty much prefers cookie dough to the actual cookies. And while that used to be me as well, I’ve found I’m just as into the chewy, gooey cookie itself. A little crispy on the outside, and all melty on the inside…..all warm straight from the oven.

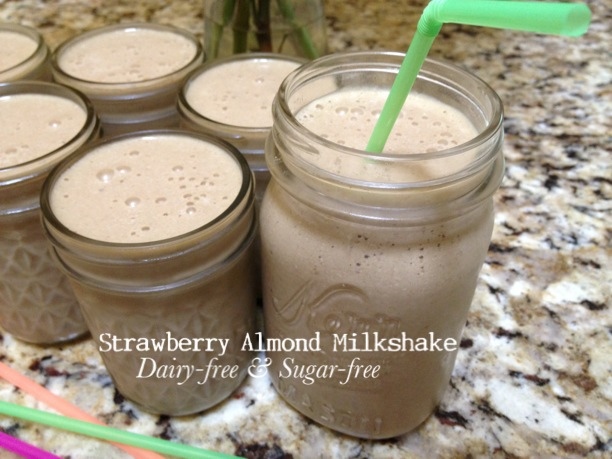
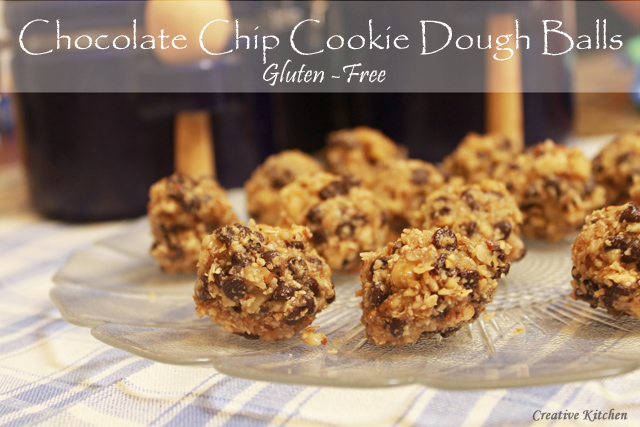
So when I set about making these cookie dough balls, I wanted them to be gluten-free and low in sugar so they fit in with the Daniel Plan. I also wanted them to be healthy, and taste as much like chocolate chip cookie dough as they could. I’m not bragging, but these cookie dough balls are a hit wherever I take them. In fact, I’m always asked for the recipe. Friends have texted me on their way to the store just to find out which ingredients to buy. They are that good! They taste best when frozen (or at least refrigerated), but you’ll find it hard to keep your hands out of the bowl.

Which do you prefer….the cookie or the dough?

Chocolate chip cookie dough balls {Gluten-free}
Author: 
Recipe type: Dessert, Treat, Gluten-free, Daniel Plan
Prep time: 
Total time: 
Serves: 15 balls
 
Ingredients
  • ½ cup oat flour
  • ½ cup pecans (crushed or ground)
  • ½ cup almond flour (or crushed/ground almonds)
  • ¼ cup shredded coconut (ground, optional)
  • ¼ cup walnuts (crushed or ground)
  • 2 Tbsp coconut oil
  • 2 tsp vanilla
  • ½ tsp sea salt
  • ½ cup maple syrup
  • 1 cup mini chocolate chips (or as many as desired)
  • ½ cup chopped walnuts
Instructions
  1. Add all ingredients in no particular order into a bowl and stir.
  2. I use my coffee grinder to make oat flour out of oats, to grind up coconut to make coconut flour and to grind any nuts I'm using. Very helpful tip and cheaper than buying almond flour.
  3. Roll into balls and freeze for 30 minutes. Can store in refrigerator or freezer.


If you enjoyed this post or recipe, please pass it along! There are many ways you can SHARE. One of the most popular options is to PIN it on Pinterest or to LIKE it on Facebook. It really makes my day! To make sure you don’t miss a post or recipe you can either follow Creative Kitchen on Facebook or Pinterest. Or subscribe by RSS subscription or Email in the sidebar. It’s FREE! Thanks for reading….I love having company in the kitchen!

3 Comments

Lately…. {Our summer update}

20140829-150929.jpg

Hi friends! Life has a way of surprising you. Summer flew by….summer dragged on. Did it really even feel like summer? In many ways, not for me. This was the first summer in a long time my family and I didn’t leave the state and take a vacation. We missed our annual 4th of July family reunion, and though we had a great time with friends here at home….it just felt strange. A little off from the normal. And that’s okay! We hit the beach every week with friends (we have a huge homeschooling community in our area), enjoyed the free summer kid movies and had a blast when family came and visited us. We took friends out kayaking with us, and spent time in the library. As you might know, kayaking is a huge stress reliever for me and feels like a mini-vacation every time I go out.

We are blessed to live in an area that tends to be a vacation spot. We live 5 minutes away from sandy beaches and the turquoise blue ocean…it really can’t get any better than that. But a change of scenery, a respite from normal is still highly desired by most and we are hoping to have a more adventuresome fall season, and perhaps some travel. How is it that fall is around the corner? Labor day snuck up on me…I had no idea it was this weekend. Really?

20140829-151115.jpg

We are now 2 weeks into the school year. We homeschool, and things are running smoothly. I have a feeling this may be our best year yet. Our girls are in 10th grade, 6th grade and 1st grade. Funny to have one in each category….elementary, middle school and high school. Our oldest is still running cross country with our local high school since she enjoyed it so much last year. It’s a great group of girls, and they have an awesome coach.

So my poor neglected blog! I’m truly hoping to get back into the swing of things around here. I’ve been busy in my kitchen, and have all kinds of goodies to share. I’ve been experimenting with gluten-free baking, and adapting recipes to fit the Daniel Plan. I still feel best when eating gluten-free, and staying away from most dairy except for occasional cheese. I can eat gluten, but just feel better when I don’t. Anyone else out there new to gluten-free living? It’s been fun experimenting! I’ll be back soon to share a new gluten-free treat….chocolate chip cookie dough balls.

So let’s hear from you….how was your summer? Did you travel anywhere or have any fun adventures to share? I’ve missed you guys, and I’m happy to be back…..fill me in!! 😉

20140829-151214.jpg
This was my little one’s first time kayaking! We had such an adventure, and we even brought one of her friends along (My friend & I were both out with our littles in tandem kayaks). We could have stayed out all day!

1 Comment

Strawberry popovers

Popovers

Have you ever made popovers? Until a couple summers ago, I hadn’t. But they were fun and easy to make, and when I get through sharing with you….you’ll want to try your hand at them. You don’t even need a special popover pan! I just used a regular dozen sized muffin tin, and it worked perfectly! Another neat trick is that you make the batter in your blender…..just like when I make crepes or my puffy pancake (also known as a dutch baby). Even though crepes were easy, these were even more so because I could just pour them into my muffin tin and bake.

And like the puffy pancake these definitely had a wow factor….but probably more so because when they puff up, they stay puffed up. Funny thing is there is no baking soda or baking powder used. My guess is it has to do with the eggs being whipped up in the blender. But I’m no scientist…..

I found the recipe originally over at the King Arthur site, and adapted it to suit my needs. You know I have trouble sticking to a recipe, and this one was no different. If you haven’t been over to the King Arthur site before make sure to take some time there to look around. They have a lot of tasty recipes, and have a growing community on Facebook and are very friendly on Instagram! And though I like to mill my own flour, I still use plenty of King Arthur unbleached all-purpose flour in my kitchen. And now that I’ve been experimenting with gluten-free baking, I can’t wait to tweak a gluten-free version.

These popovers are perfect with any sliced fruit you want to add….strawberries, peaches, blackberries, raspberries….whatever. But my favorite way will always be with butter, lemon juice, a sprinkling of powdered sugar and pure maple syrup. The lemon juice just takes them over the top. It’s my favorite way to eat crepes and dutch baby pancakes too. I made these popovers last June, and find it hard to believe I’m just getting around to passing them on to you. Seriously, where does the time go? It’s almost June again!

What are your favorite toppings for crepes and popovers? Have you make popovers before? Tell me your experience!

Strawberry popovers
Author: 
Recipe type: Breakfast
Prep time: 
Cook time: 
Total time: 
Serves: 12
 
Quick & easy popovers are a fun breakfast for kids.
Ingredients
  • 4 large eggs, warmed in a cup of hot water
  • 1½ cups milk, lukewarm
  • ½ tsp salt
  • ¼ tsp nutmeg
  • 1½ cups Unbleached All-Purpose Flour
  • 3 Tbsp melted butter
Instructions
  1. Preheat oven to 450. Make sure you have a low rack to place popovers on.
  2. Butter a 12 cup muffin tin.
  3. When oven is fully preheated, being making the muffin batter.
  4. In a blender, blend eggs, milk, salt and nutmeg. Blend well. Add in flour and blend until thoroughly mixed.
  5. Add in melted butter, and blend until just combined.
  6. Pour batter into muffin tins until ⅔ to ¾ full.
  7. When oven is fully preheated, place popovers in oven and bake for 20 minutes. Without opening the oven door, reduce heat to 350 and bake for an additional 10-15 minutes.


If you enjoyed this post or recipe, please pass it along! There are many ways you can SHARE. One of the most popular options is to PIN it on Pinterest or to LIKE it on Facebook. It really makes my day! To make sure you don’t miss a post or recipe you can either follow Creative Kitchen on Facebook or Pinterest. Or subscribe by RSS subscription or Email in the sidebar. It’s FREE! Thanks for reading….I love having company in the kitchen!

1 Comment

Yuca Fries {Secret Recipe Club}

20140216-201208.jpg

It’s Secret Recipe Club time again! This month I was assigned From Brazil to You. Denise is a trained chef, and was born and raised in Brazil. I had so much fun reading through her blog while trying to decide on a recipe. So many great recipes to choose from.

I was excited to find these Yuca Fries. I’d never heard of yuca, but I realized I’d seen it before at the grocery store. It’s one of those vegetables I’d always wondered about. Now I know…Yuca is a root vegetable. I learned from Denise that Yuca or cassava is the third-highest source of carbohydrates in the tropics and consumed by half a billion people around the world. It’s also capable of growing in poor soil.

20140216-201229.jpg

I’m on day 22 of the Daniel Plan so was excited to find something from her blog on the plan. I always like to try new things, and have new challenges in the kitchen. The yuca was easy to peel. After that you cut it in 3 inch chunks and boil for about 15 minutes. The slice into fries and bake. It’s that easy. The Yuca fries turned out crispy and tasty.

Be sure to stop over and visit Denise’s blog. Many hours of interesting reading and recipes to look through!

20140216-201239.jpg

4.3 from 3 reviews
Yuca Fries {Secret Recipe Club}
Author: 
Recipe type: side dish
Cuisine: Brazilian
Prep time: 
Cook time: 
Total time: 
Serves: 2
 
Ingredients
  • 1 large or 2 medium fresh yuca/cassava or 6 frozen yuca sections
  • olive oil
  • salt and pepper to taste
  • A pinch of dried cilantro leaves (or your favorite dried herbs)
  • Fresh lime juice
Instructions
  1. Preheat oven to 425.
  2. Bring a pot of water to a boil.
  3. Peel the rough outer layer including the purplish layer. Cut into 3 inch sections, place in boiling water and boil for about 15 minutes or until fork tender and the ends start to split open a bit.
  4. If you are using frozen yuca/cassava, just place into water since it's already peeled.
  5. Remove from water using a slotted spoon and drain on paper towels. When they are cool enough to handle, cut into half lengthwise and remove the thin woody stick that runs through the middle.
  6. Then cut them into sticks or desired shape and spread them out in a single layer on a baking sheet. Drizzle with olive oil, sprinkle salt and pepper and any herbs or seasonings. Fries are done when they are crispy on the outside and soft on the inside.
  7. Squeeze a little lime juice over them. Serve with ketchup or your favorite dipping sauce.

8 Comments

Strawberry Almond Milkshake {Daniel Plan}

20140205-155733.jpg
I’m super excited about the Daniel Plan! It’s just the type of “clean eating” lifestyle that totally works for me. I’ve always felt great on the Daniel Fast, but I also know my body does best eating small amounts of meat and eggs. On the Daniel Fast (vegan), I tend to rely on whole grains which hurt my tummy if I ate too many of them. I was hungry all the time on the Daniel Fast, so had to rely on small meals throughout the day. I had to think too much. I just wasn’t able to get enough protein. So last spring I kept saying how great it would be if I could keep eating this way…no sugar, no flour, no dairy and just add back in meat and eggs.

I wanted to lean toward paleo, but as we got closer to the summer and vacations, my eating habits strayed from eating clean. I would just track calories in My Fitness Pal. I have to say tracking calories makes it easy for the sugar monster to get out of control, and not eat as many veggies and fruit as I should. After all, I’m still in my calorie range. When I heard of the Daniel Plan, and googled and the food list came up….I was thrilled!

Basically…..

No gluten
No dairy
No sugar
No flour

I can eat lean meat and eggs. And during the detox the only whole grains I can eat are brown rice and quinoa. I’ve had very small amounts when I ate them. I just finished the 10 day detox, and I feel great! I’m actually probably going to continue on the detox for awhile longer. The Daniel Plan is 40 to 50 days depending on if you count your detox as part of the 40 days or not. After the 10-day detox, you can add in limited types of dairy and gluten in the form of whole grains if you find you don’t have a sensitivity to dairy or gluten (another benefit to the Daniel Plan is figuring out if you have dairy or gluten sensitivity). My teenager is doing it, and my hubby just jumped on board a few days ago also. So nice to have that extra support in the house.

I want to share a new recipe I created based on an almond butter smoothie in the Daniel Plan book. I guess I should say “loosely” based, because I basically changed the whole entire smoothie recipe….I just got the idea to add the almond butter to the smoothie. Now I’d read about it before, but for some reason I’ve never really wanted to add it. I mean almond butter is okay…but I’m not like the tons of other bloggers out there that love almond butter. I don’t really like it plain, and I’ve never wanted to add that many calories to my smoothies before. I was happy with my normal smoothie routine (greens and frozen fruit).

Well I’ve been missing out, I tell ya! The almond butter and walnuts I add to this shake really make it creamy and thick. I like the texture…not frozen, and it really reminds me of a milkshake. There is so much you can do with this recipe….very versatile, and you can swap out the frozen strawberries and pineapple for other types of frozen fruit. Their smoothie had hemp seeds, chia seeds and pumpkin seeds. I didn’t have any of those so didn’t add them. Their smoothie had coconut oil (which I was out of), so I used unsweetened shredded coconut. Stay tuned for more Daniel Plan recipes….I’ve been totally inspired lately.

Have you heard of The Daniel Plan? Are you interested in cleaning up your eating? Would love to hear any healthy living, diet or fitness goals you’ve been working on.

Most of my Daniel Fast Recipes will work on the Daniel plan! Just double check the ingredients. You can get them here:  Daniel Fast Recipes.

5.0 from 1 reviews
Strawberry Almond Milkshake {Daniel Plan}
Author: 
Recipe type: Beverage, Daniel Plan, Smoothie
Prep time: 
Total time: 
Serves: 2
 
Ingredients
  • 1 cup water
  • 2 Tbsp almond butter
  • ½ cup unsweetened vanilla almond milk (I use Almond Breeze)
  • 2 bananas (ripe, but not frozen)
  • 7 walnuts
  • ¼ cup unsweetened shredded coconut
  • 1 cup frozen strawberries
  • 1 cup frozen pineapple
  • 1 cup baby spinach, baby kale or other greens (I buy a mixed bag at Costco, organic)
Instructions
  1. Place all ingredients in Vita-mix or other blender and blend well.
  2. If using a blender that's not as strong, blend frozen fruit and greens with liquid before adding the rest of the ingredients.


If you enjoyed this post or recipe, please pass it along! There are many ways you can SHARE. One of the most popular options is to PIN it on Pinterest or to LIKE it on Facebook. It really makes my day! To make sure you don’t miss a post or recipe you can either follow Creative Kitchen on Facebook or Pinterest. Or subscribe by RSS subscription or Email in the sidebar. It’s FREE! Thanks for reading….I love having company in the kitchen!

Related Posts Plugin for WordPress, Blogger...
2 Comments